How to Cook Shredded Chicken
Here’s how to cook shredded chicken that’s fast, flavorful, and juicy every time! Use it to top salads, in tacos, on sandwiches, and in any of your favorite shredded chicken recipes.
Sure you can use store-bought rotisserie chicken, but when you see how fast and easy it is to make shredded chicken at home, you won’t want to.
Another benefit of cooking it yourself is that you can control the ingredients.
While there are a variety of different methods to cook chicken for shredding or dicing, poaching (gently cooking the chicken in water) is the one I’ve found to be the quickest and easiest, with the smallest amount of clean up.
- You don’t need any equipment other than a pot to make it.
- The chicken comes out perfectly tender and juicy every time. (Ever wonder how some restaurants get their chicken so moist? Cooking in water is the secret!)
- This method works for boneless skinless chicken breasts or boneless skinless chicken thighs.
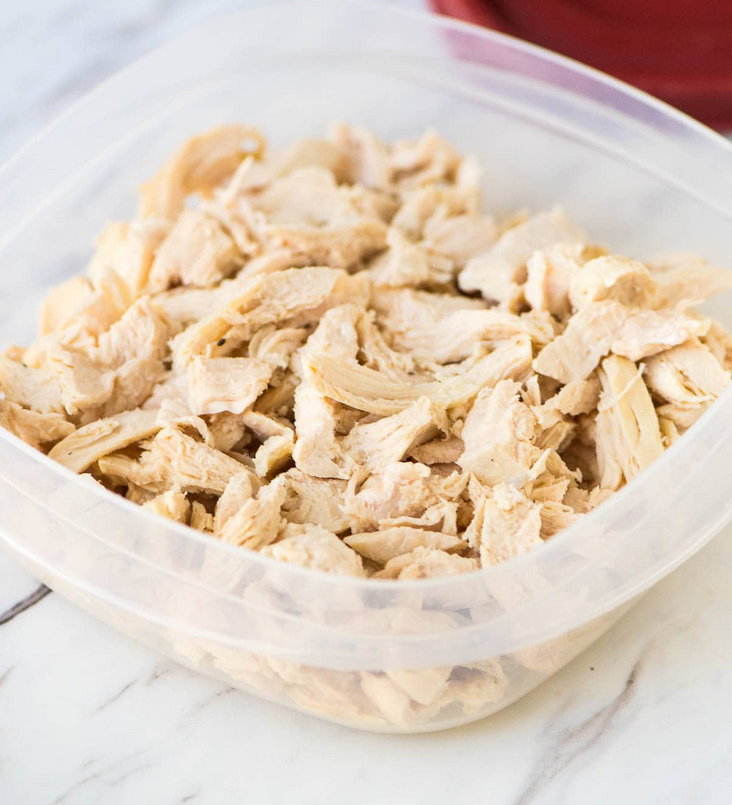
- You can also refrigerate the chicken for up to 4 days or freeze it, so it’s perfect for meal prep!
Other options include shredded chicken in the oven (Baked Chicken Breast), or if you want to use your appliances like your pressure cooker or slow cooker, you can prepare Instant Pot Shredded Chicken, Crockpot Shredded Chicken, or Air Fryer Chicken Breast.
How to Make Shredded Chicken: 4 Steps
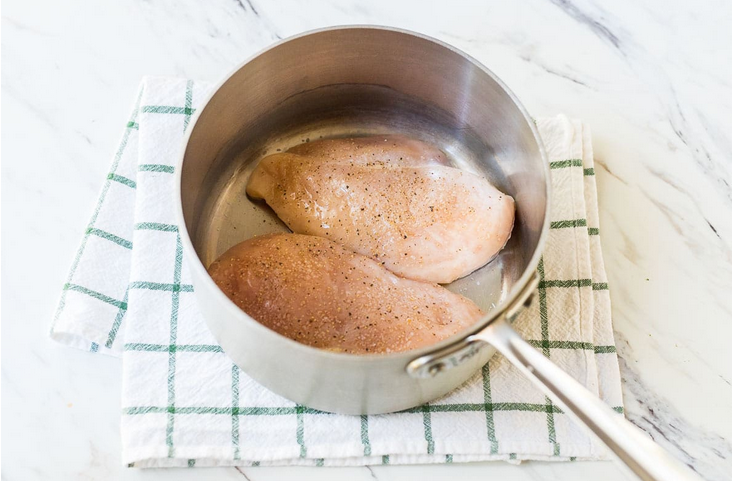
- STEP ONE: Place boneless, skinless chicken breasts (or thighs) in the bottom of a large pot, then season them.
- Essential Seasoning. I opt for a generous pinch of salt and pepper. If you like, you can add other seasonings, such as a bayleaf, poultry seasoning, or a few springs of fresh herbs
- Mix It Up. This shredded chicken recipe is meant to be more of a blank canvas to add to a wide range of recipes, though you can certainly season it anyway you like. Because I know I have some fellow Tex-Mex fans, if you are looking for Mexican shredded chicken options, I recommend these Instant Pot Shredded Chicken Tacos and this Instant Pot Mole Chicken.
ARRANGING THE CHICKEN
- If you are cooking a larger number of chicken breasts or thighs, you can overlap them slightly.
- If you have a lot of overlap, I’d suggest upgrading to a larger pot or using two separate pots for a big batch.
STEP 2: Cover the Chicken with 1 Inch of Water
YES, water (not broth!). If you like you can use chicken broth or vegetable broth, though I find that with this cooking method, you don’t need it. Unless you have some that you need to use up, save yourself an ingredient and make this shredded chicken without broth.
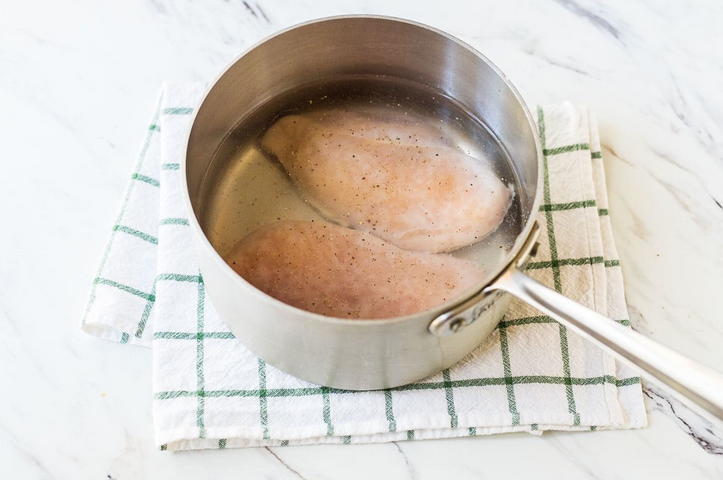
STEP 3: Place Pot on the Stove and Bring Water to a Gentle Boil.
- Once the liquid is boiling, reduce the heat and let the chicken breast or thighs simmer for 8 to 16 minutes, depending upon the size and number of chicken breasts or thighs that you are poaching.
- As long as you check the chicken and remove it once it reaches the magic temperature, your chicken will be perfect every single time.
STEP 4: Check for Doneness.
- Chicken is done when the center reaches 165 degrees F (use an instant-read meat thermometer for guaranteed safety and accuracy—I love this one and use it regularly).
- Check your chicken OFTEN towards the end. If your chicken is dry or tough, it is because it is overcooked.
- For the Juiciest Chicken. Remove the chicken a few degrees early. Place it on a plate, cover it, and let rest for five more minutes. The carry over cooking will finish the job.
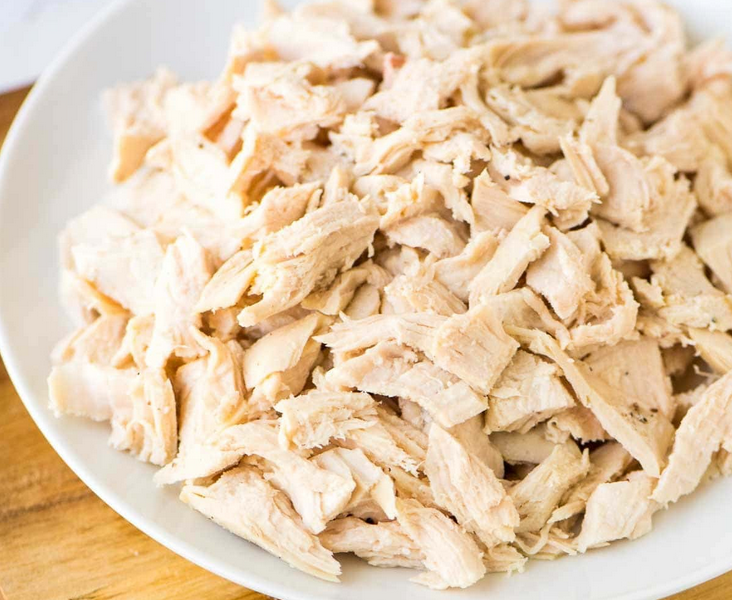
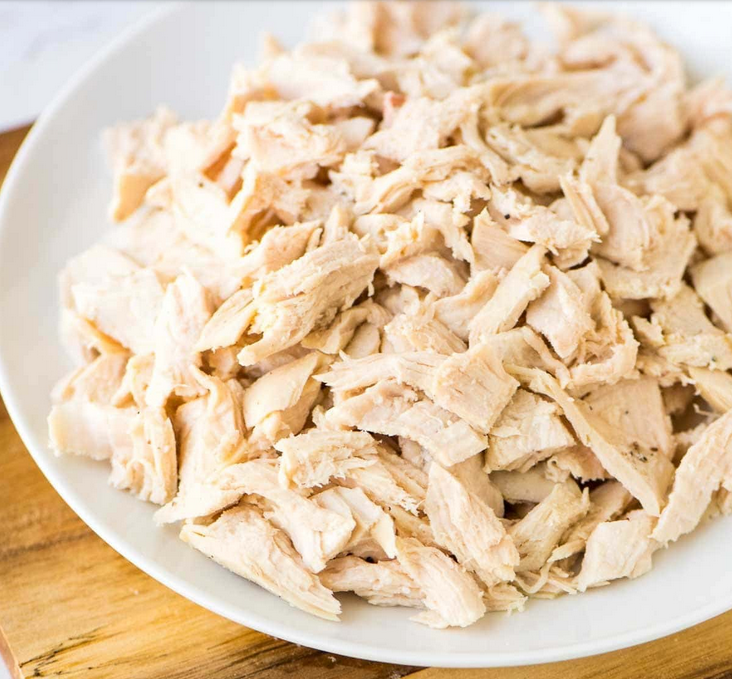
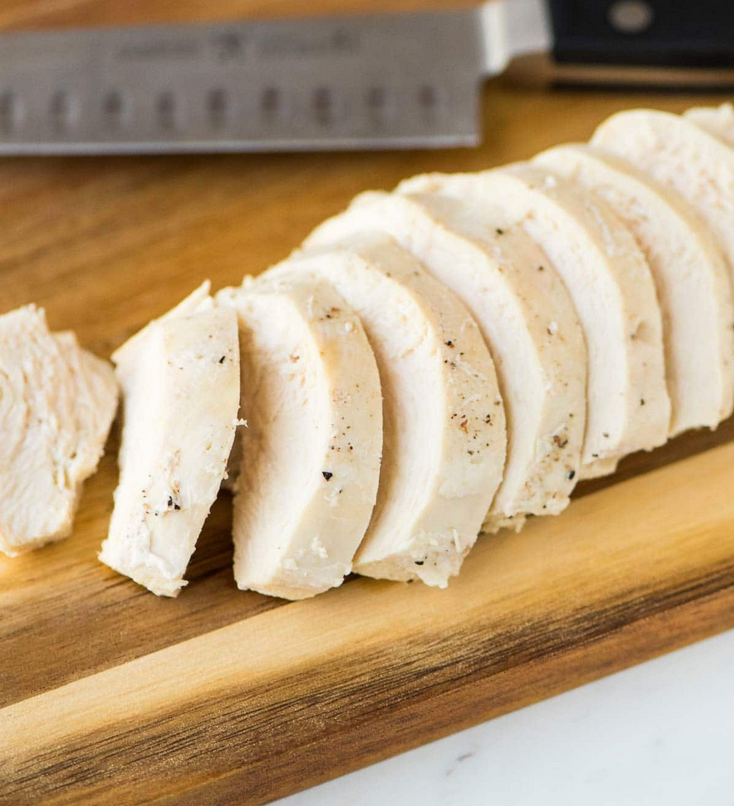
That’s it! From here, you can shred the chicken (or dice it), then use it however you please.
My Secret Tip to Easily Shred Chicken
- The easiest way to shred chicken is with a hand mixer. Place the chicken in a large mixing bowl, then use a hand mixer on low speed to break the chicken into shreds. This hack is a complete timesaver, especially if you are making a larger amount.
- If you are making a very large batch, you can also shred it in a stand mixer.
- No mixer? No problem. You can shred the chicken the old fashioned way with two forks (you’ll need forks or protective gloves to shred hot chicken by hand), or my other favorite method: shred the chicken with your fingers. As soon as the chicken is cool enough to handle safely, gently pull it apart with your fingers.
- Instead of shredding the chicken, you can also slice or dice it, which is even faster and perfect for green salads, pasta salads, and wraps.
Shredded Chicken Recipes
Mexican Recipes. Make shredded Chicken Enchiladas, an easy Chicken Quesadilla, chicken tacos, chicken burritos, chicken tostadas, a Chipotle Bowl…the options are endless!
Pasta Salads. This Chicken Caesar Pasta Salad is a must.
Chicken Salad. The classic! Try my Healthy Chicken Salad, Curry Chicken Salad, or dairy-free Whole30 Chicken Salad.
Green Salads. ANY salad you like: Greek Salad; BLT Chopped Salad; BBQ Chicken Salad.
Frittatas. This Chicken Broccoli Frittata is one of my favorite brunch recipes, and the leftovers are fantastic for lunch.
Chicken Wraps. Chicken Caesar Wrap or Asian Chicken Wraps anyone?
Chicken Casseroles. Chicken and Biscuits and Chicken Broccoli Rice Casserole are classic, comforting, and forever scrumptious. For a different spin, try this Cheesy Corn Quinoa Casserole.
Spaghetti Squash Boats with Chicken. A low-carb option that’s to-die-for no matter what diet you do (or do not!) follow.
Chicken Soup. Chicken and Gnocchi Soup, Chicken Stew, Creamy Chicken Noodle Soup, and Chicken Tortilla Soup are even faster and easier with pre-made shredded chicken.
How to Store Shredded Chicken
Shredded chicken is perfect to keep on hand in the refrigerator during the week to cut down on meal-prep time and to add quick servings of protein to your meals.
- TO REFRIGERATE SHREDDED CHICKEN. Let the cooked chicken cool completely. Place in a shallow, airtight container and press a sheet of plastic against the top. Refrigerate for up to 4 days.
- TO FREEZE SHREDDED CHICKEN. Follow the steps above, but instead of refrigerating, store the chicken in the freezer for up to 2 months. You can also store it in heavy duty freezer bags. Be sure to squish out as much extra air as you can.
Why Not Just Buy Shredded Chicken?
I also use this method for making shredded chicken any time a recipe calls for store bought shredded rotisserie chicken.
While you can buy shredded chicken, the benefits of making it yourself are notable.
- Health Considerations. Shredded chicken that you make at home is almost guaranteed to be lower in sodium and fat than store-bought rotisserie chicken.
- Cook the Meat You Want. I like to make shredded chicken breasts, because most of the time I prefer white meat. If your household is more into dark meat, you can cook all chicken thighs. Want a mix? You can choose a blend too!
- By weight, homemade shredded chicken is far less expensive than precooked store bought chicken.
What About Other Cuts of Chicken?
While I photographed this recipe with shredded chicken breasts, this method also works for making boneless, skinless shredded chicken thighs.
- If you use thighs, the meat may cook more quickly depending upon their size, so I recommend checking a few minutes early to ensure that you have moist, juicy diced or shredded chicken.
- I would not recommend this method with chicken wings or legs. Because neither contains a significant amount of meat, these cuts are better to cook for enjoyment on their own, versus for shredding to use in other applications.
Kam’s court, a chinese restaurant in Charmhaven, which was established in 1992. A friendly, family restaurant that has always been a good party place for family gatherings. We provide delicious and popular Chinese cuisine and are licensed. We invite you to come and enjoy our warm and friendly hospitality.
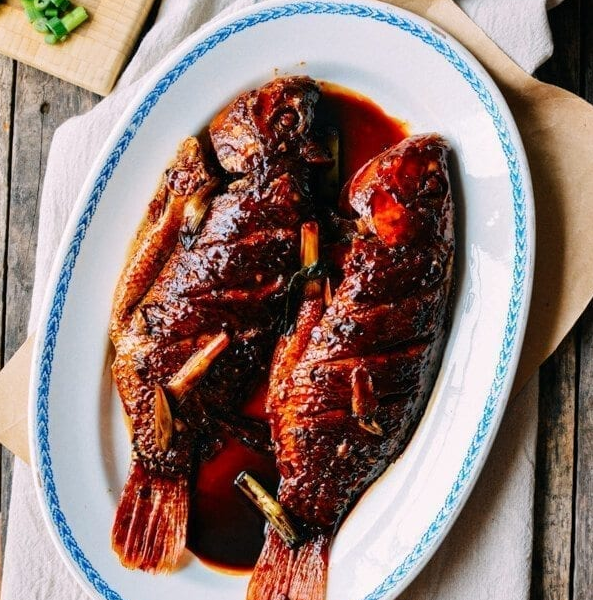
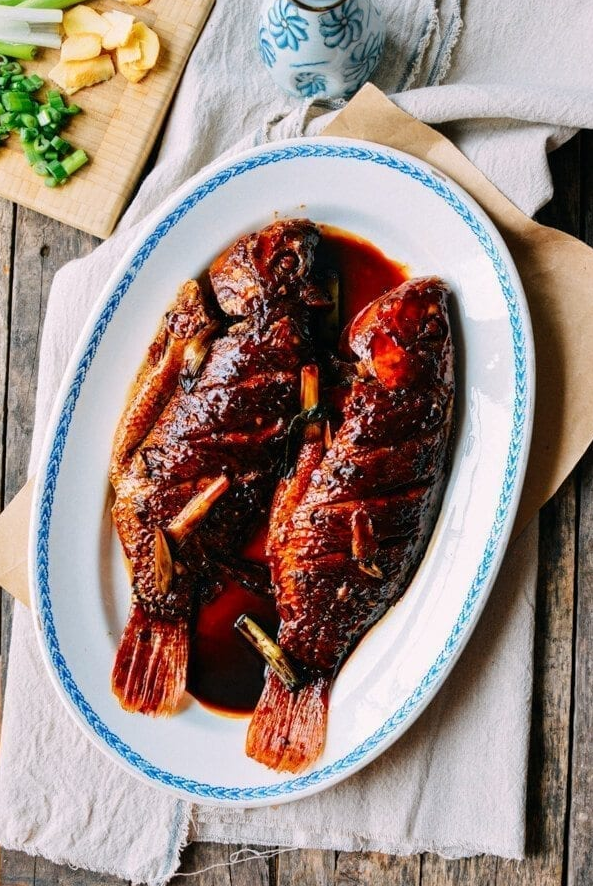
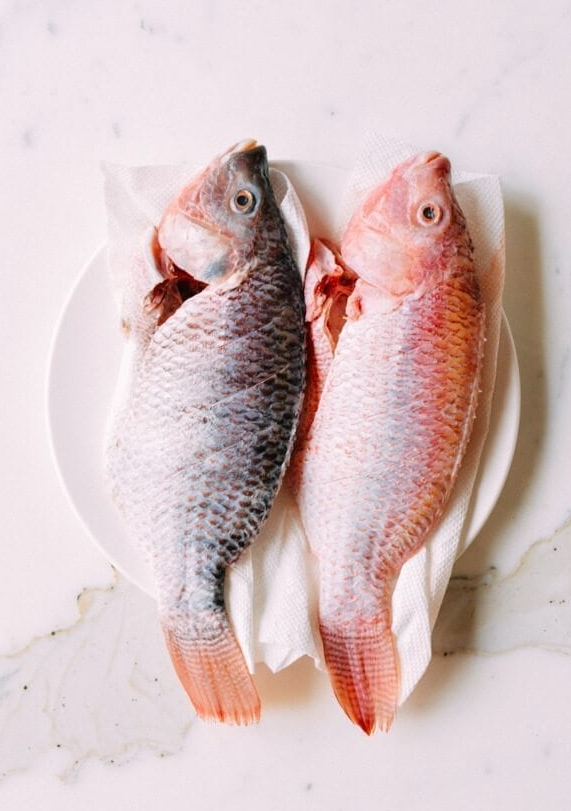
braised fish in brown sauce
A Chinese New Year is not a New Year without fish, and you MUST have two of them: one for New Year’s Eve and one for Chinese New Year’s Day. That’s why, on the eve of Chinese New Year, we’re posting this Chinese Braised Fish (red cooked fish), or hong shao yu recipe for all of you! You have a multitude of fish dishes to choose from including our Cantonese whole steamed fish but this red cooked braised dish is certainly a winner.
The first time I saw him cook this braised fish, I was in awe at the amount of wine, vinegar and soy sauce he poured into the wok. One look at the recipe ingredient list might make you think there must be a mistake, but rest assured, it’s right. In fact, it’s exactly why this fish is so intensely good.
Chinese Braised Fish: Recipe Instructions
Using paper towels, pat the fish thoroughly dry. Wrap the fish in fresh paper towels while you prepare the rest of the ingredients. The goal is to make the fish as dry as absolutely possible. Use a sharp knife to score both sides of the fish three times. This will help them cook quickly.
Once the prep work is done, unwrap the fish and dust it with a thin, even layer of cornstarch on both sides. This step will help keep the skin in tact during pan-frying.
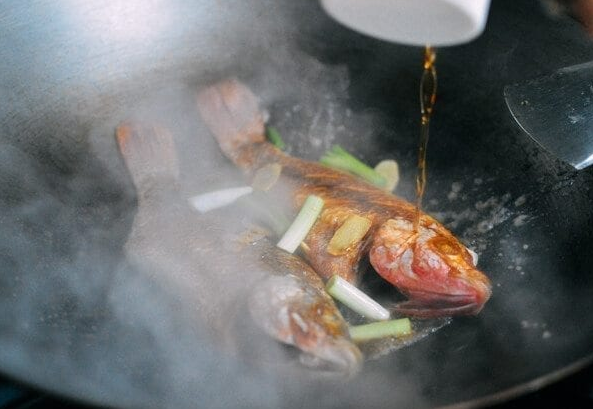
Heat the wok until it starts to smoke, and immediately add the oil and ginger slices.
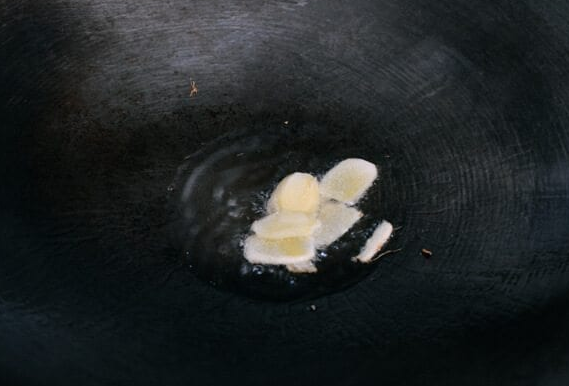
Reduce the heat to medium. Once the ginger slices start to brown, remove them from the wok and set aside. Carefully lay the fish in the wok, and DO EVERYTHING IN YOUR POWER NOT TO MOVE OR TOUCH THE FISH for the next 5 minutes. You can tilt the wok around so the oil glides around to evenly brown the fish.
After 5 minutes, shake the wok slightly to see if the fish has seared enough to stop sticking to the wok. This is when you can carefully flip the fish over and do the same process for the other side.
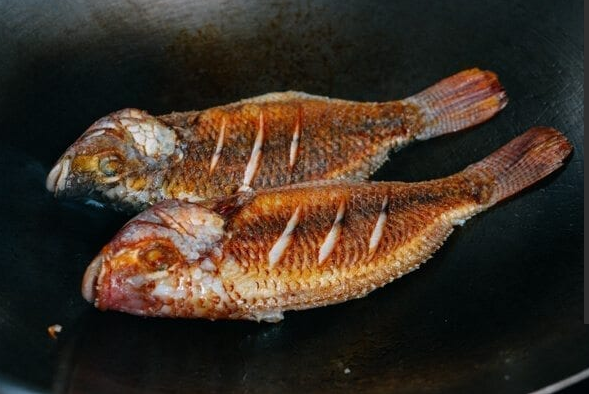
Once both sides are nicely browned, add the ginger back to the wok…
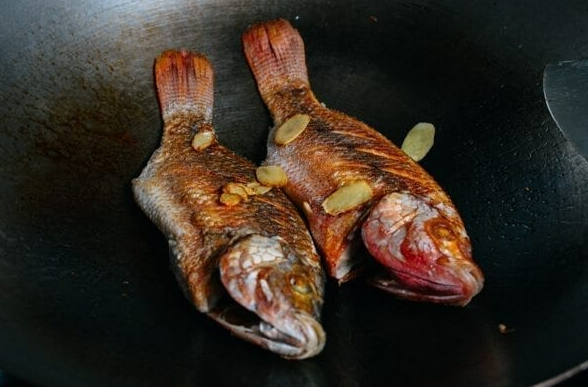
Also add the scallions, shaoxing wine, sugar, Chinese black vinegar, dark soy sauce, and light soy sauce.
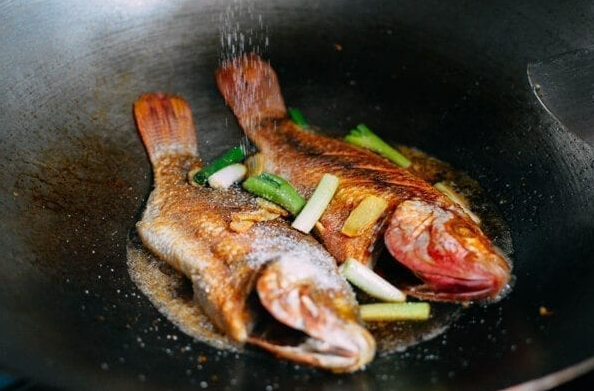
Keep the heat at medium low, and cook the fish by continuously spooning the cooking liquid over the fish.

Cook on each side for 4-5 minutes. By now, the sauce should be cooked down and almost syrupy. Serve!
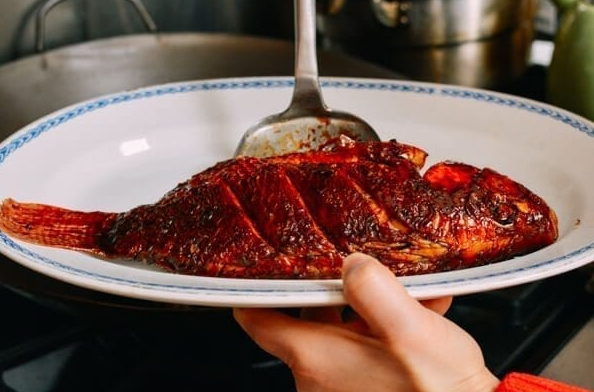
Tip: If you want to make sure the fish is done, carefully pick apart the thickest part of the fish. If the meat readily comes apart from the bone, it’s done. You can plate it so that the hole you made is facing down!
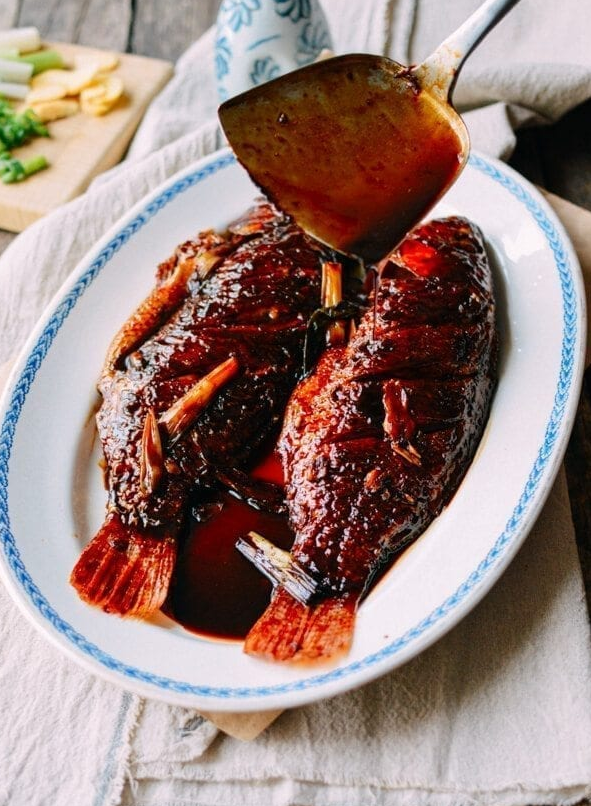
Serve this Chinese Braised Fish (Hong Shao Yu) at your next dinner party!
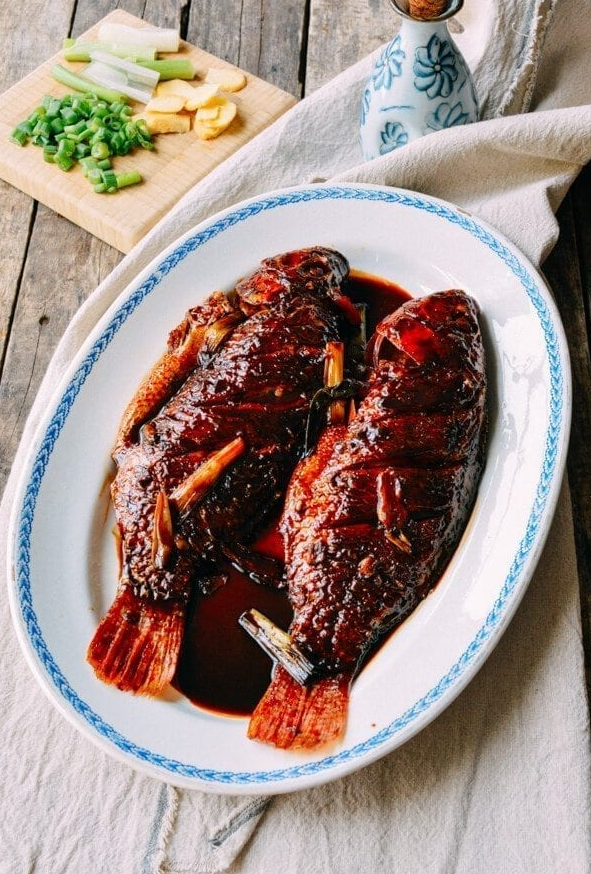
If you’re serving this Chinese braised fish for Chinese New year, make sure you cook two and leave one intact for the new year as a a symbol of abundance!
Kam’s court, a chinese restaurant in Charmhaven, which was established in 1992. A friendly, family restaurant that has always been a good party place for family gatherings. We provide delicious and popular Chinese cuisine and are licensed. We invite you to come and enjoy our warm and friendly hospitality.

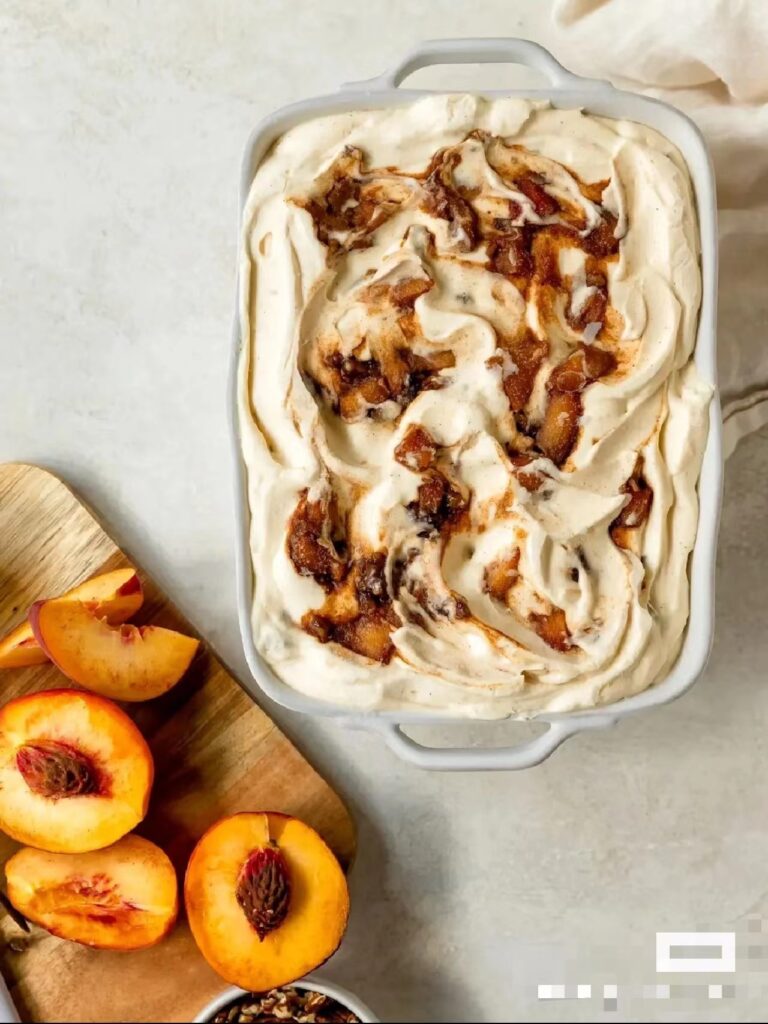
Pecan Rum Raisin Ice Cream
Ingredients
Deselect All
1/3 cup dark raisins
1/3 cup golden raisins
1/2 cup dark rum, such as Mount Gay
1 3-inch strip of orange zest
1 1/2 cups heavy cream
3/4 cup whole milk
1 vanilla bean, split lengthwise
2/3 cup sugar, divided
4 extra-large egg yolks
Pinch of kosher salt
1/2 cup pecans, toasted, cooled and roughly chopped
Directions
- Place the dark and golden raisins, rum and orange zest in a small saucepan. Bring the mixture to a boil over medium heat, remove from the heat, cover and set aside.
- Meanwhile, pour the cream, milk, vanilla bean and 1/3 cup of the sugar into a large saucepan and heat it to a simmer over medium heat. Place the egg yolks, the remaining 1/3 cup of sugar and the salt into the bowl of an electric mixer fitted with the paddle attachment and beat on high speed for 3 to 4 minutes, until very thick. When the beater is lifted, the mixture will fall back on itself in a slow ribbon. With the mixer on low, pour 1/2 cup of the hot cream mixture into the egg mixture. While stirring with a wooden spoon, pour the egg mixture back into the saucepan and cook over medium-low heat, stirring almost constantly, for 8 to 10 minutes, until thickened (175 degrees F to 180 degrees F on a candy thermometer). The mixture will be thick enough to coat the back of the spoon (your finger should leave a trail on the back of the spoon). Immediately pour the mixture through a fine-mesh sieve, discarding the vanilla bean. Refrigerate for at least 3 hours, until cold.
- When ready to freeze, drain the raisin mixture, reserving the rum and discarding the orange zest. Mix 3 tablespoons of the drained rum into the cream mixture (discard the rest). Pour the mixture into an ice cream maker and freeze according to the manufacturer’s directions. At the end, stir in the raisins and pecans, transfer to a quart container and freeze.

Cook’s Note
To toast pecans, roast them in a 350 degrees F oven for 5 to 10 minutes, until lightly browned.
Kam’s court, a chinese restaurant in Charmhaven, which was established in 1992. A friendly, family restaurant that has always been a good party place for family gatherings. We provide delicious and popular Chinese cuisine and are licensed. We invite you to come and enjoy our warm and friendly hospitality.
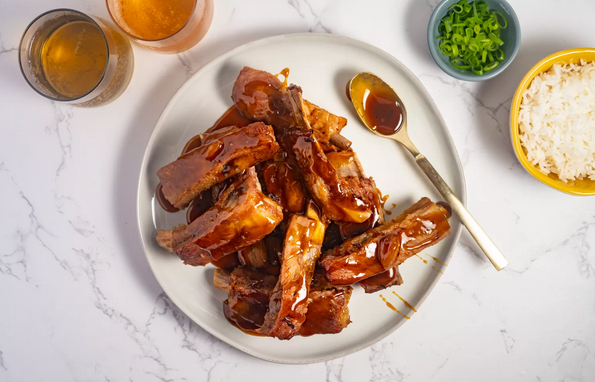
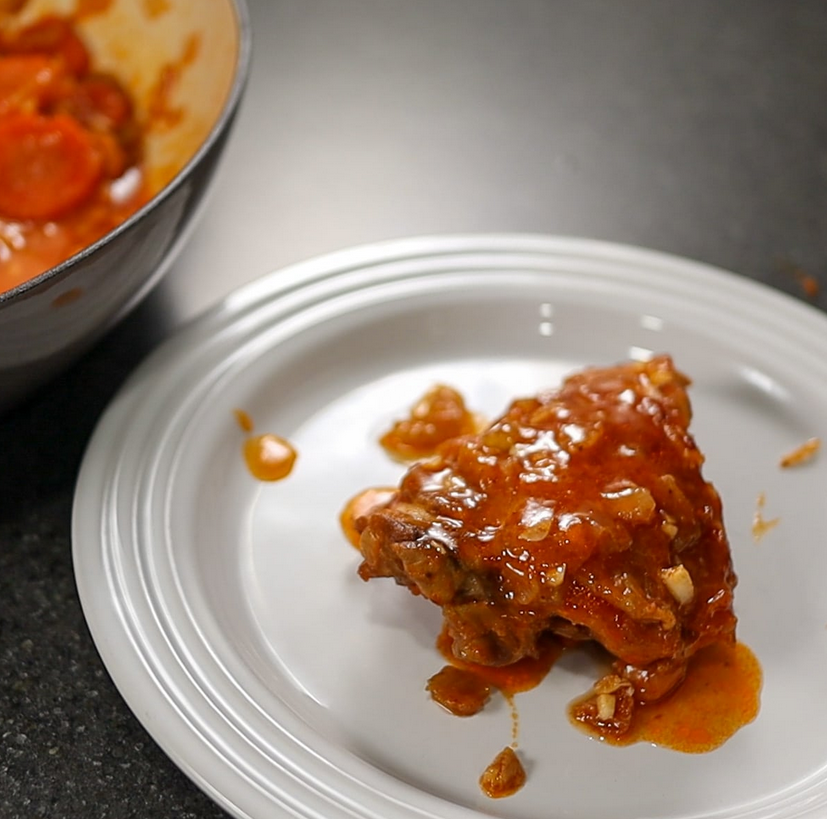
Chinese Dry Garlic Spareribs
Chinese dry garlic spareribs. The ribs are first boiled in water and then simmered in a sauce made of brown sugar, garlic, soy sauce, and mustard. The result is a rib that is sticky and sweet—hand wipes are definitely needed!

Ingredients
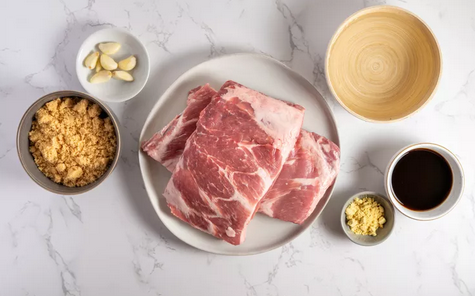
3 pounds spareribs
1 1/2 cups brown sugar, packed
1 1/2 cups water
4 to 5 cloves garlic
4 1/2 tablespoons light soy sauce
1 1/2 tablespoons dry mustard
Steps to Make It
01 Gather the ingredients.
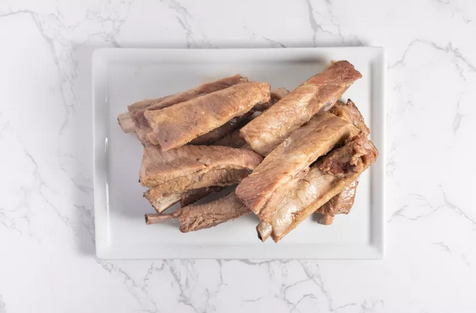
02 Bring a large pot of water to boil. Add the ribs to the boiling water; cover and allow to simmer for 30 minutes until tender.

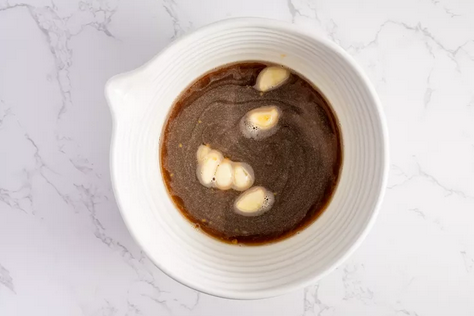
03 While the spareribs are simmering, mix together the brown sugar, water, garlic cloves, light soy sauce, and dry mustard in a small bowl.
04 Remove the spareribs from the pot and slice the meat between the bones. (If you like, set aside the pork broth to use in another recipe.) Clean out the pot.
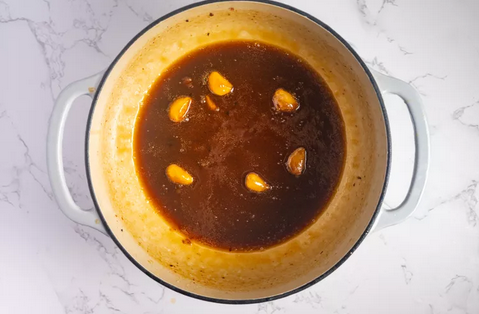
05 Add the sauce ingredients to the pot and bring to a boil. Add the spareribs, bring back to a boil, and then lower the heat to a simmer for 10 to 15 minutes, basting often.

06 Remove the ribs to a serving platter. Return the sauce to the heat and simmer to thicken; pour over the ribs and serve.
All About Spareribs
Pork spareribs are the most popular type of rib so you should not have any difficulty finding them in the meat section of your supermarket. Spareribs are cut from the bottom section of the ribs (baby back are cut from the top section) and have flat bones with a lot of fat marbling throughout the meat. They are sold as slabs, with about 11 bones per slab and averaging 3 pounds per slab. Keep in mind, however, that half of this weight is the bone, so if it seems like you are buying more than you need, calculate the amount of meat per person, not the total weight of the rack of ribs. A good rule of thumb is that one slab of spareribs can feed two people. Also, look for ribs with pinkish-red meat and no discoloration.
Fresh spareribs will keep for 2 to 3 days in the refrigerator and up to six months in the freezer; it is best to use them soon after you buy them, however. If you freeze the ribs or buy frozen, plan for 12 to 14 hours in the fridge to thaw. No matter what, let the ribs come to room temperature for about 30 minutes before cooking.
This recipe is very adaptable in terms of servings; you can easily increase the number of spareribs and then adjust the other ingredients accordingly.
Kam’s court, a chinese restaurant in Charmhaven, which was established in 1992. A friendly, family restaurant that has always been a good party place for family gatherings. We provide delicious and popular Chinese cuisine and are licensed. We invite you to come and enjoy our warm and friendly hospitality.
How To Braise Chicken
Let’s learn how to braise chicken. This technique of braising is one of my favorite ways to cook chicken. I think pretty much anything that you cook low and slow can be delicious.
Now braising is usually done for tough pieces of meat, and chicken really does not fall under this category but the flavor you get from braising really increases the flavor of the chicken. When choosing the chicken pieces to braise I would focus on pieces with the bone-in and larger pieces like the legs and thighs. If you have a big enough pan you could even braise an entire chicken.

Ingredients
1.5 lbs Bone-in chicken thighs
1 tsp Salt
1 tsp Freshly ground pepper
16 oz Chicken stock
3 Carrot
3 Celery
1 Onion
1 tbsp Avocado oil
1 tbsp Tomato paste
3 cloves Garlic
9 Simple steps for braised chicken
Prepare the vegetables
The 3 most common vegetables used in braising are carrots, celery, and onions. This is called mirepoix and it is a staple in French cuisine.
Wash the carrots and celery
Roughly chop the carrots and the celery, I like to shoot for 3/8in wide.
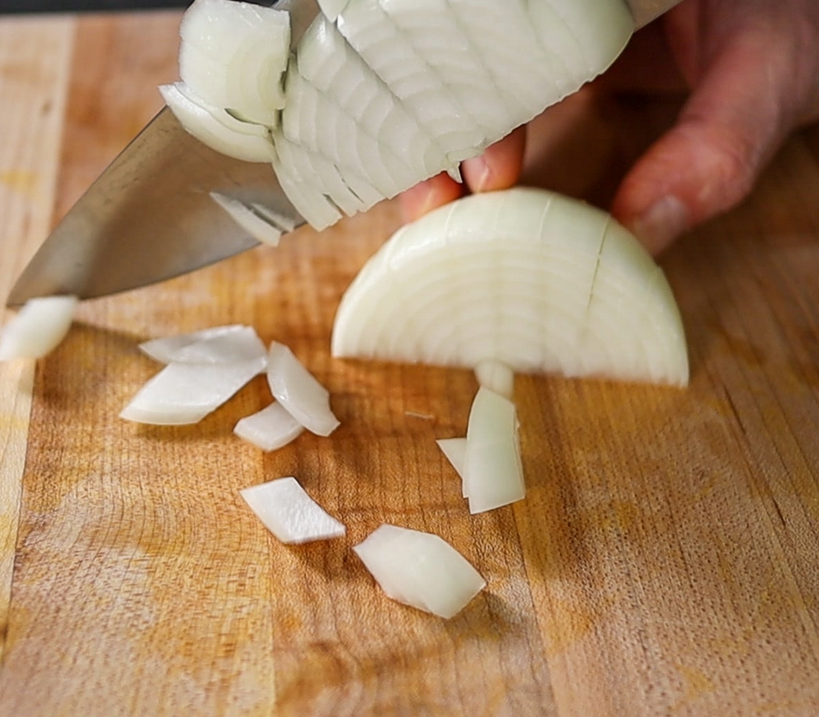
Chop up your garlic and the onions.
Prepare the pan
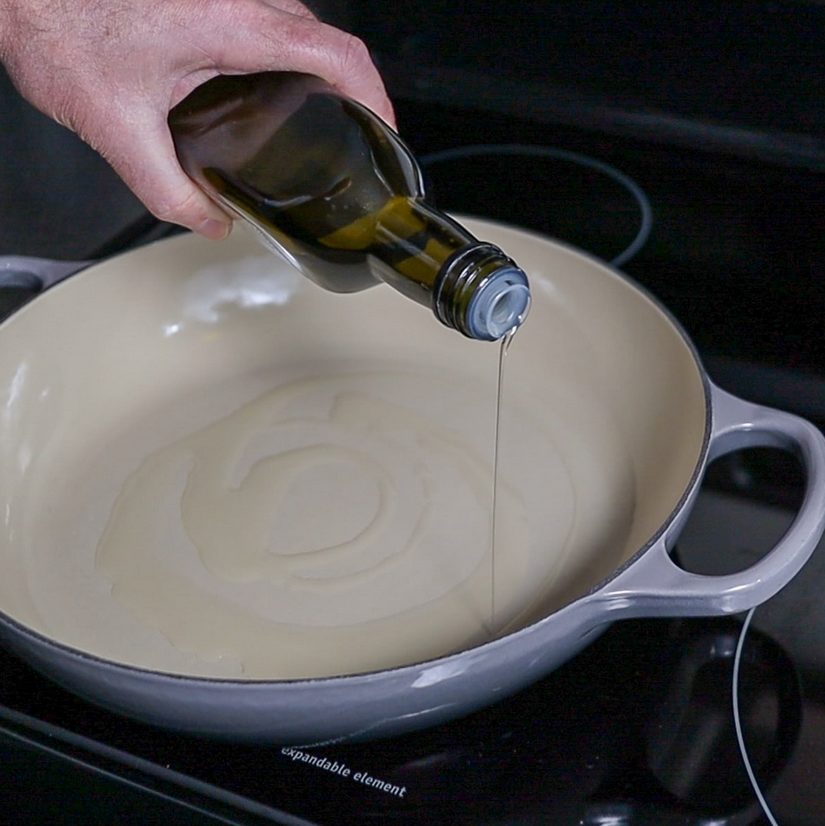
Go ahead and heat a pan on the stovetop. If you’re using a dutch oven you want to put it on low heat seeing that they heat up hot fast.
You need to choose a pan that you can use in the oven or stovetop that has a lid to finish off the cooking. “It Must Have a Lid”
After the pan is hot enough add some oil that you think you will not smoke. I like to use avocado oil when cooking with hotter pans because it has a high smoke point.
Brown the chicken

Take your chicken thighs and lightly sprinkle them with salt. You want to keep the salt to a minimum at this point because we are going to add chicken stock and that is salty in itself.
After the oil is heated up go ahead and add the chicken thighs with the skin side down. Do not move the chicken around, let the hot pan and oil brown and crisp up that skin.
Test the chicken to see if it is stuck to the pan after a few minutes, if it still is then it is not time to flip it yet.
When you test it and it is no longer stuck to the pan and it has a nice brown color then the chicken is ready to flip over.
Remove the chicken thighs from the pan and put them to the side for a moment.
Also, try breaking down your own chicken! I have a full breakdown of how how to cut up a whole chicken.
Saute onions, garlic, and tomato paste
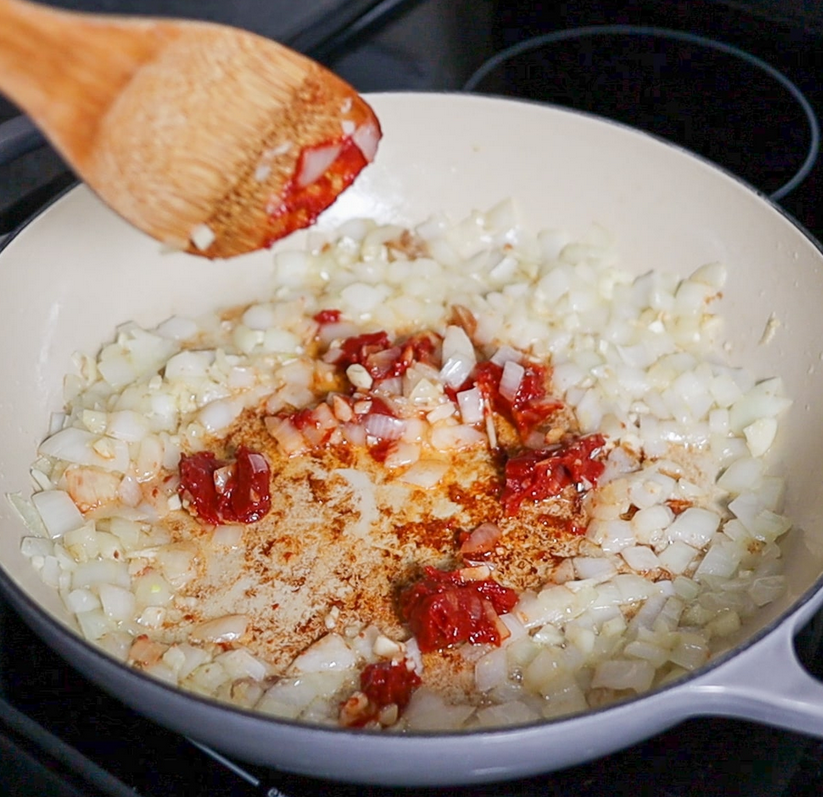
Add the onions and garlic to the pan. Saute them around until you get the strong aroma of the garlic coming through.
At that point add the tomato paste and work that around the dish. You want the flavor of the tomato paste to shine and adding it to a hot pan will help this.
Work the tomato paste around the pan to help cook some of the paste to help release some of the flavors that hide inside.
Deglaze the pan

Before the brown bits on the bottom of the pan burn, go ahead and add a little bit of the chicken stock to the pan.
Adding the stock when it’s hot will deglaze the pan and take that flavor of the fond in the pan and add it to the dish.
Move a spatula around the bottom to get the fond off of the pan. Adding a little bit of the stock will let you see how well you’re getting the fond off the pan.
Add carrots and celery
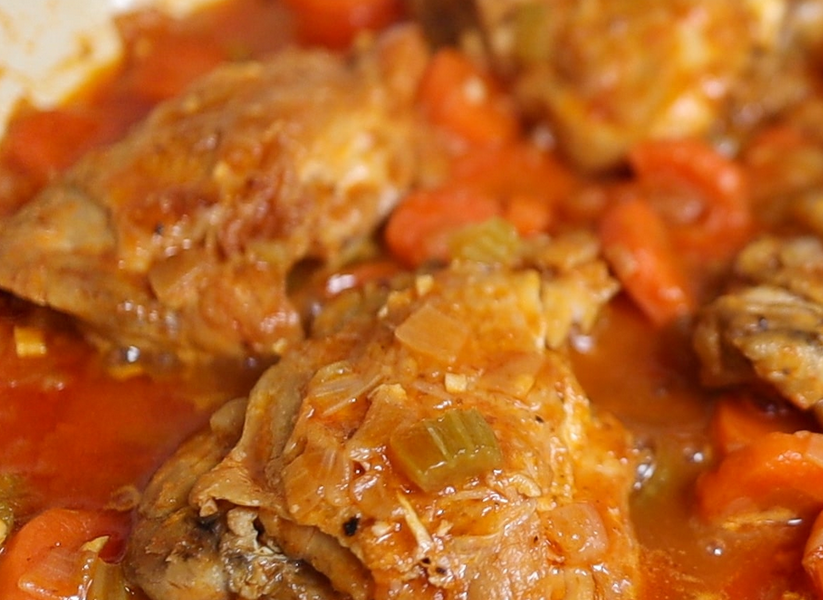
Now that the pan is deglazed a bit add the carrots and celery to the pan. Work them around the pan to cover them with the sauce that you created with the onions, garlic, tomato paste, and chicken stock. Let a simmer for a few minutes.
Add the chicken back to the pan
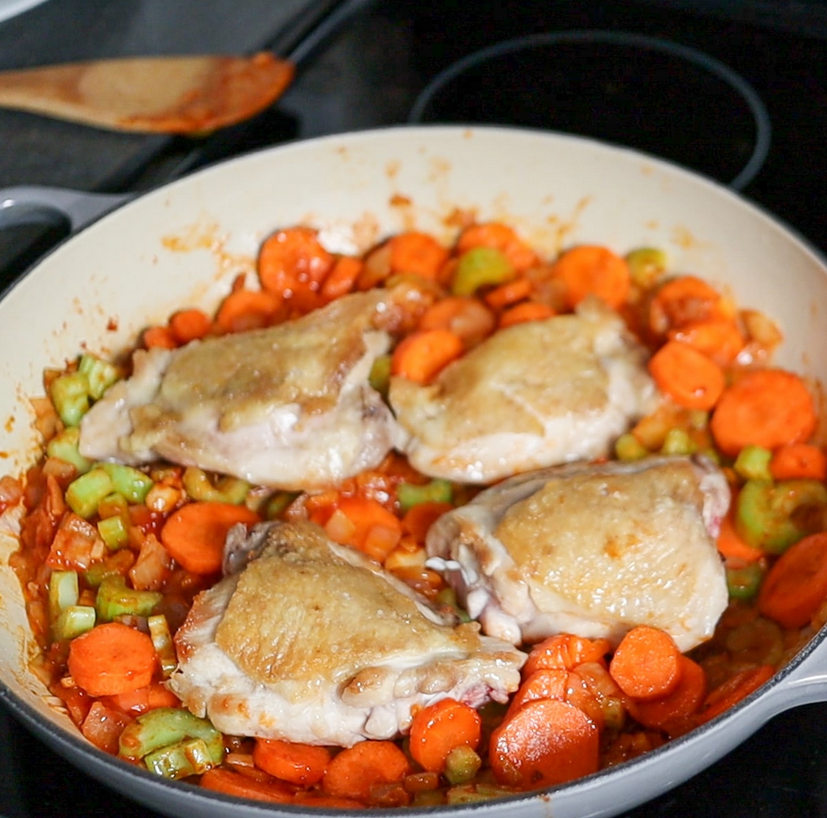
Now that we have added the vegetables to the pan and have deglazed the pan, and added the flavors of the fond to the dish. Go ahead and add the chicken back to the dish.
Add some fresh ground pepper to the chicken.
I like to add the skin side up so that the bones are under the liquid.
Add the remaining stock to cover a third of the way up the chicken. If you do not have enough stock at the very least add some water to bring up the level in the pan.
Slow-cook the chicken
Add the cover to the pan and put it into the preheated oven at 300°F or if you are cooking it in a dutch oven just leave it on the stovetop on low if you like.
The plan is to cook it low and slow after the browning of the chicken we did on the stovetop. Adding a cover will keep the moisture in the dish and this is a key part of cooking with this method.
This is going to bring out the flavor and something to the chicken that you only see when you braise it!
Remove from heat

Check the chicken to see if it is falling off of the bone. When it reaches this state you know that it is done cooking. Remove it from the stovetop or the oven and let it rest with the cover off.
If you remove it from the liquid without it cooling in the liquid you might end up with tough meat. So, don’t rush it. You need to be patient and wait 20-30 minutes if you’re using a dutch oven.
Serve the dish
At this stage, you should have perfectly cooked chicken thighs that are falling off the bone. Serve it with your favorite vegetable!
To take this dish to the next level you can make a sauce from the mirepoix that was cooking at the bottom of the pot.
Kam’s court, a chinese restaurant in Charmhaven, which was established in 1992. A friendly, family restaurant that has always been a good party place for family gatherings. We provide delicious and popular Chinese cuisine and are licensed. We invite you to come and enjoy our warm and friendly hospitality.
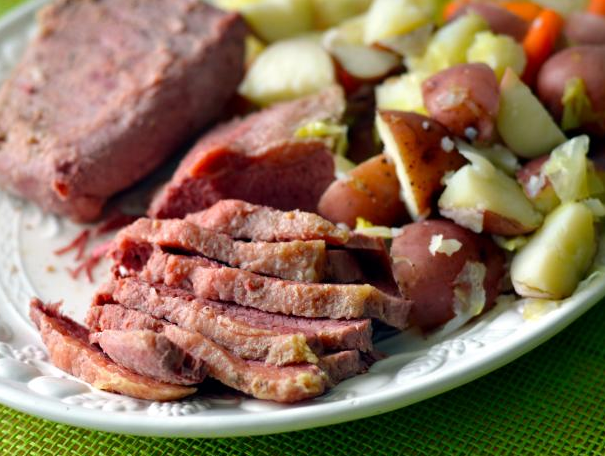
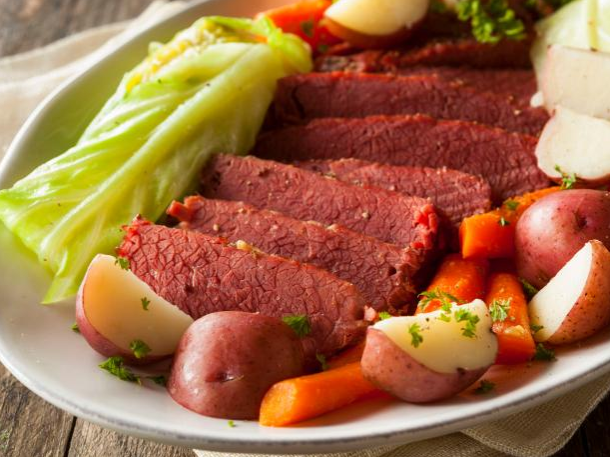
What Is Corned Beef?
Corned beef — what would a Rueben be without it? Or St. Patrick’s Day? Pick one up at the market after you learn exactly what it is and how to cook it.

You probably have heard of corned beef and cabbage being eaten around St. Patrick’s Day; maybe you’ve also seen corned beef sandwiches at a Jewish deli. But what exactly is corned beef? How is corned beef made? What is the history of corned beef? There is so much to learn, but mainly, don’t be intimidated: We’ll walk you through everything you need to know.
What Is Corned Beef?
Corned beef is meat that has been cured in a salt solution. Before refrigeration, meat was salted and cured to be preserved. Historically, any type of meat could be put through the curing process that makes what we know as corned beef today. In the U.S., corned beef is made from beef brisket. You might have seen it at Jewish delis, and that’s because the brisket is a traditionally kosher cut of meat that’s cured to tenderize it.
Why We Eat Corned Beef on St. Patrick’s Day
St. Patrick’s Day as we know it comes from the early Irish Americans. They decided to transform the holiday from a religious feast to a day of celebration for their heritage and homeland. In honor of the occasion, they would splurge on corned beef and accompany it with their traditional potatoes and affordable cabbage. Irish immigrants often lived near Jewish ones, and bought their meat from kosher butchers. Vacuum-sealed pieces of corned beef are now available in the meat aisle at many supermarkets.
The holiday meal quickly became popular throughout the country, with Abraham Lincoln choosing corned beef, cabbage and potatoes as the meal for his first Inaugural Luncheon (which took place on March 4, 1861 — less than two weeks before St. Patrick’s Day).
Though the dish has remained popular since then, the popularity of corned beef and cabbage never made it back across the Atlantic. If you find yourself in Ireland on St. Patrick’s Day, you’ll have better luck ordering lamb or bacon instead.
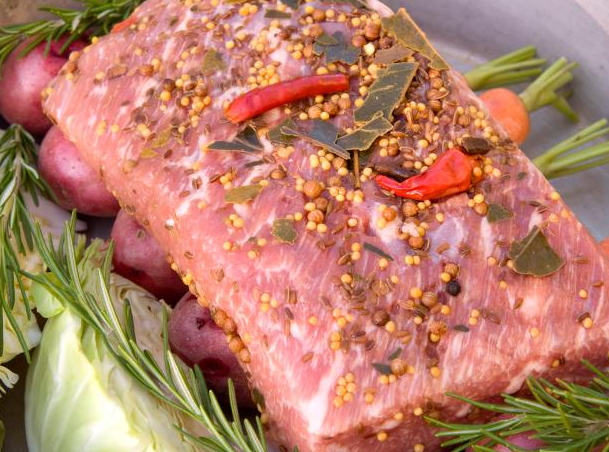
How Is Corned Beef Made?
Corned beef is made in a curing process that takes five to eight days. When DIY-ed at home, a single beef brisket is placed in a large pot of saltwater and spices and kept in the fridge for a week. If you’re curious about this process, check out our complete guide on how to make corned beef from scratch.
Large delis will typically have huge barrels of briskets curing in a walk-in cooler.
In addition to beef, water and salt, there are spices, garlic and herbs. The flavor profile often includes bay leaf, black peppercorn, mustard seed, dried red pepper and coriander. If that blend sounds familiar, it’s because it’s same list of spices that are packaged as pickling spice. Not surprising, since corned beef and pickles are commonly made in the same place: a deli. And also maybe why a pickle is always served alongside a good corned beef sandwich.
Why Is Corned Beef Pink?
In addition to the salt and spices that compose corned beef brine, most companies that make corned beef add a salt-nitrite blend called pink curing salt to prevent the beef from spoiling while it’s curing. Pink salt looks exactly like regular table salt, only it’s pink so people don’t get confused and use it to season food. It’s used in many cured meats: bacon, hams, salami and hotdogs.
Why Is It Called Corned Beef?
It’s actually pretty simple — corned beef got its name from the dry curing process used to preserve the meat. A slice of beef was covered in “corns” (large, coarse pellets of salt), which would draw out the moisture and prevent the growth of bacteria.
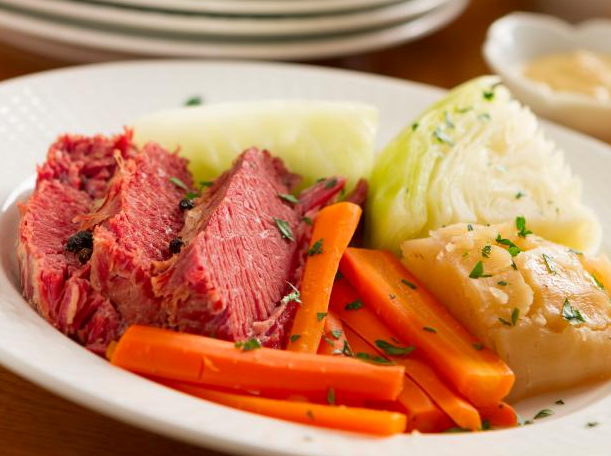
How to Cook Corned Beef
Corned beef is made with beef brisket, a cut of meat that is naturally tough, so it needs to be braised: cooked with moisture at a very low temperature. Cooking low and slow is the key to flavorful, tender corned beef. There is more than one way to braise (in the oven, on the stove, in a slow cooker or in an Instant Pot) and all of them work for corned beef. For more details on braising corned beef using each of these methods, head over to our article: What’s the Best Way to Cook Corned Beef?. The ingredients are the same no matter what method you choose. The liquid is usually water with another handful of the brining spices added. Skip the salt; the brining took care of that.
How Long to Cook Corned Beef
You may be wondering how long to boil corned beef. The answer to this question depends on the size of your piece of corned beef. A 3-pound piece of corned beef brisket, for example, takes about 3 hours to braise on the stovetop at a gentle simmer. You’ll know corned beef is done cooking when it’s very tender but not falling apart. A fork should easily pierce through the meat.
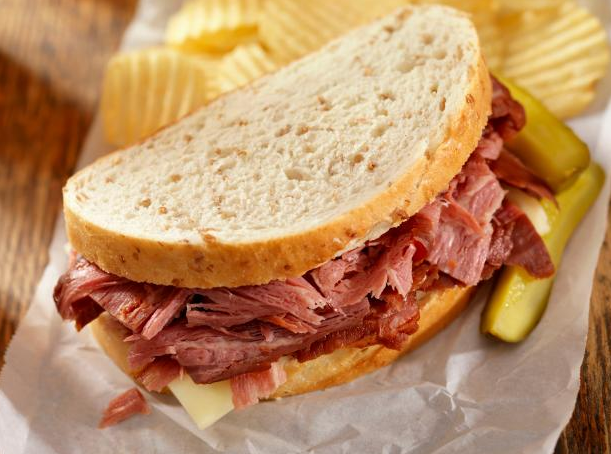
What Is the Difference Between Corned Beef and Pastrami?
Corned beef and pastrami start out the same: briskets are brined and then the corned beef is ready to be cooked. For pastrami, the process is not over. The cured brisket is dried off and then covered with a thick coat of crushed black pepper, coriander, mustard seed, garlic and whatever secret ingredient the deli making it uses. The next step is a day of cold smoking, which imparts flavor but does not cook the pastrami. Finally, the pastrami is steamed to preserve its crust – if it were braised, the crust would float off in the liquid. For even more info on all the differences, check out our story Corned Beef vs Pastrami.
How to Make Corned Beef Hash
Cooked leftover corned beef is perfect for making corned beef hash, a dish full of crispy bites of potato and crackling but succulent corned beef. Heat some oil in a large skillet over medium high, add chopped cooked corned beef and cook until it starts to brown. Then add diced cooked potatoes and diced onion and cook undisturbed until they start to brown and crisp on the bottom. Continue to sauté until the hash is evenly browned. Optional: serve an egg on top.
Kam’s court, a chinese restaurant in Charmhaven, which was established in 1992. A friendly, family restaurant that has always been a good party place for family gatherings. We provide delicious and popular Chinese cuisine and are licensed. We invite you to come and enjoy our warm and friendly hospitality.
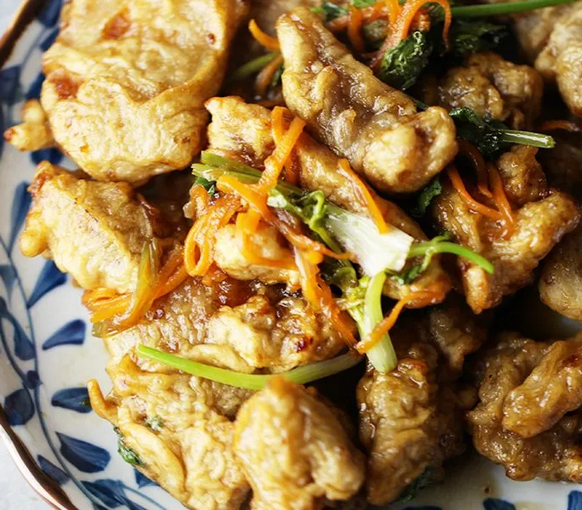
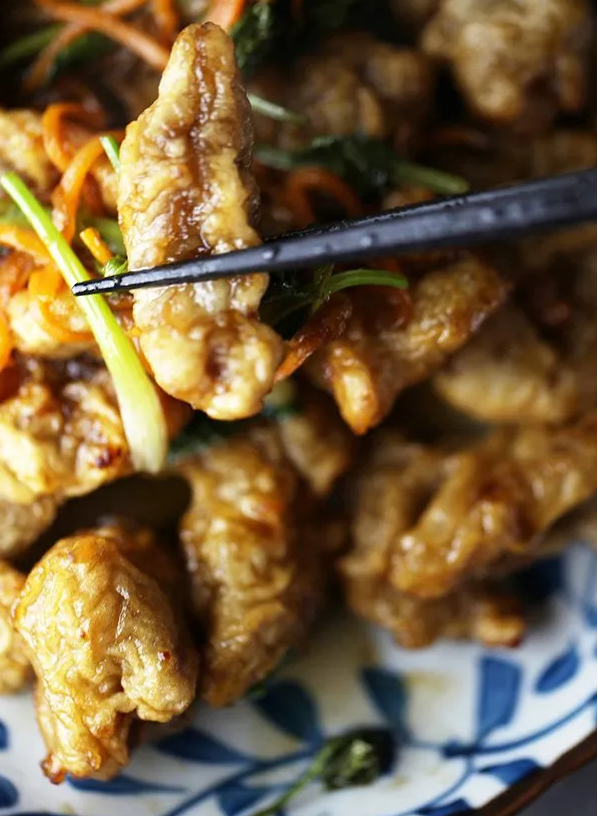
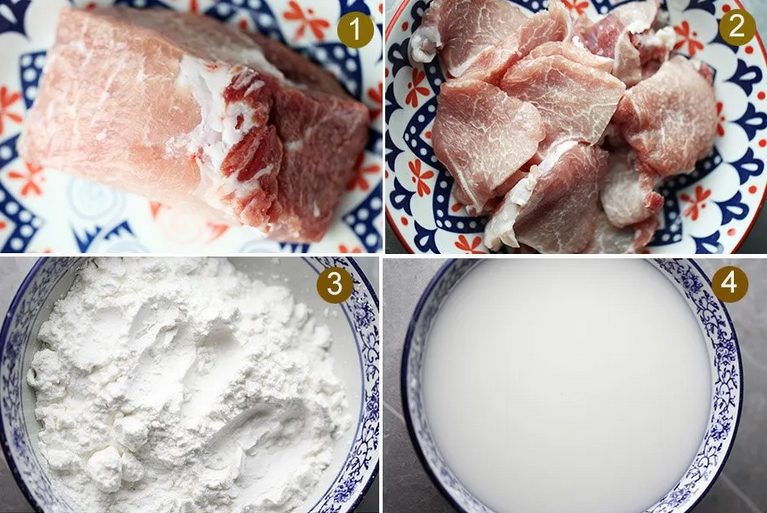
Double Cooked Pork Slices
The Chinese name for this dish is Guo Bao Rou which is so famous that it can be the representative of Northeastern dishes. The ingredients used are relatively simple in meat dishes. The point is to cook, do you have the ability to fry the meat slices so that the outside is very crispy and the inside is tender.
If you go to restaurants in the Northeast area of China, this dish is on almost every menu. As a dish to test the skill of chefs in the Northeast of China, the success of this dish depends on the skill and experience of the chef. The sweet and sour sauce should also be adjusted just right. There are basically two types, some with tomato sauce, and some without, all of which are equally delicious.

What I want to say is that I love this dish so much. Pork with a crispy skin, dipped in sweet and sour sauce, you can’t help but eat it piece by piece. If you haven’t tried it, do try it, you won’t be disappointed.
Cooking notes:
It’s still more difficult to cook than it looks. I cooked this recipe many times to get the points below:
- -3 mm is better.
- Add some white egg to corn starch.
- The best starch is potato starch.
Equipment
- Pot for deep-fried
- Wok for stir-frying
Ingredients
- For the pork
- 500 gram lean pork, slices about 2-3 mm thin for every piece
- 1 cup potato starch, 2 cup water
- 2 cups oil for fried
- 1/2 teaspoon salt
- One egg, only use egg white
- 2 teaspoon shaoxing wine
- For the sauce
- 1/2 teaspoon salt
- 6 tablespoon sugar
- 6 tablespoon vinegar
- 10 gram scallion, shredded
- 3 tablespoon water
- Others
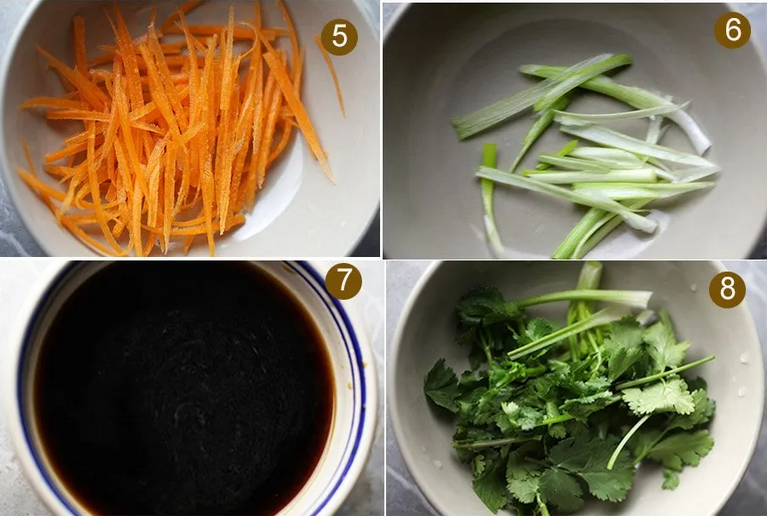
- One part of one carrot, about 15 gram, shredded
- 2 parsley, coarsely grated
- 5 gram scallions, shredded
Instructions
1. Marinate the pork slices with shaoxing wine and 1/2 teaspoon salt for 10 minutes.
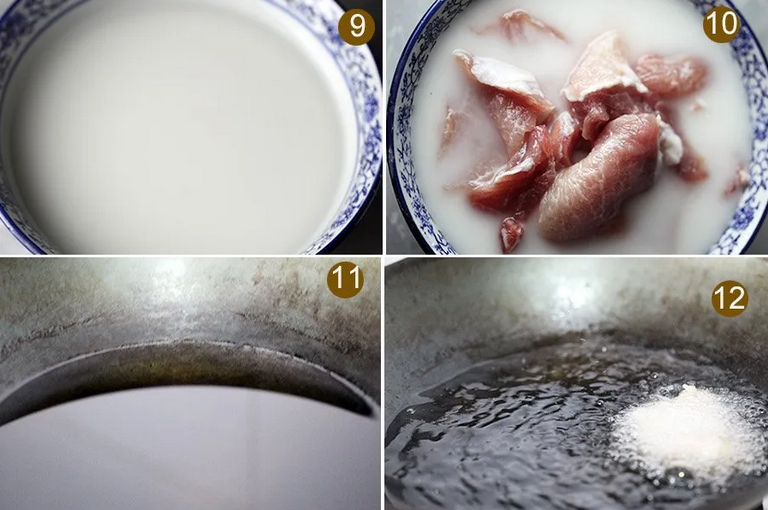
2. Add water to potato starch, set aside for 20 minutes until layered, Drain the upper layer of water, only keep the starch liquid,.
3. Add the pork slices and egg white to starch liquid . Make each piece of meat evenly starchy.
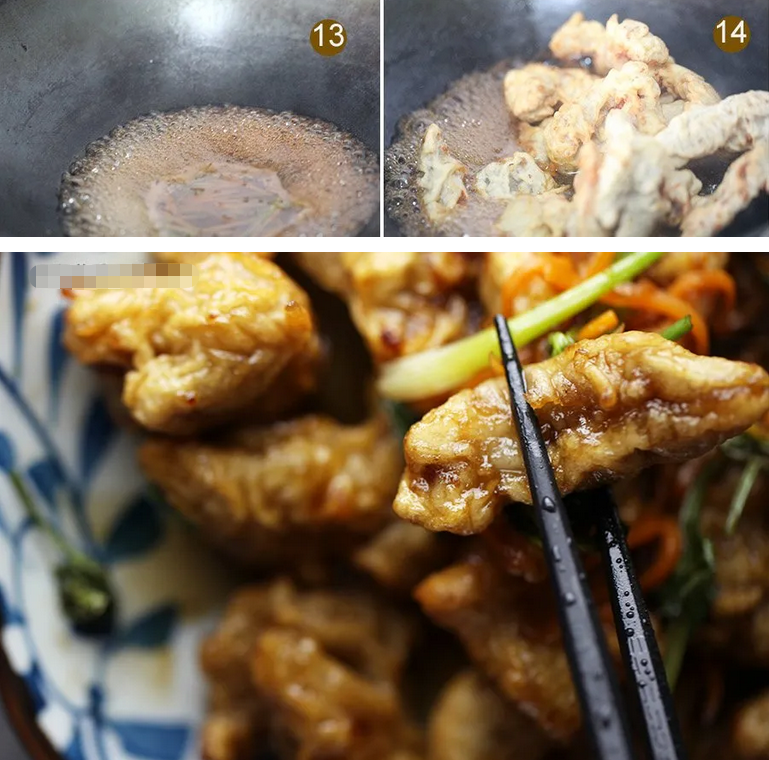
4. Add oil to a wok, heat the wok over medium heat, fry the pork in turn till harder, fish out.
5. Heat the wok over high , add pork, fried again, untill brown, remove to a plate.
6. Mixed the sauce ingredients well, add the sauce to another wok, bring to boil.
7. Add fried pork,carrot shredded, parsley chopped, scallions shredded, toss the wok for 2-3 times, let every piece pork be in sauce, remove to the plate immediately.
Kam’s court, a chinese restaurant in Charmhaven, which was established in 1992. A friendly, family restaurant that has always been a good party place for family gatherings. We provide delicious and popular Chinese cuisine and are licensed. We invite you to come and enjoy our warm and friendly hospitality.
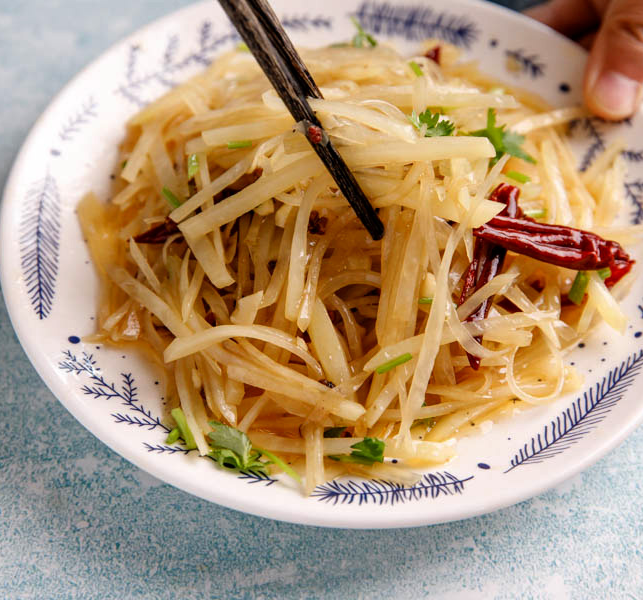
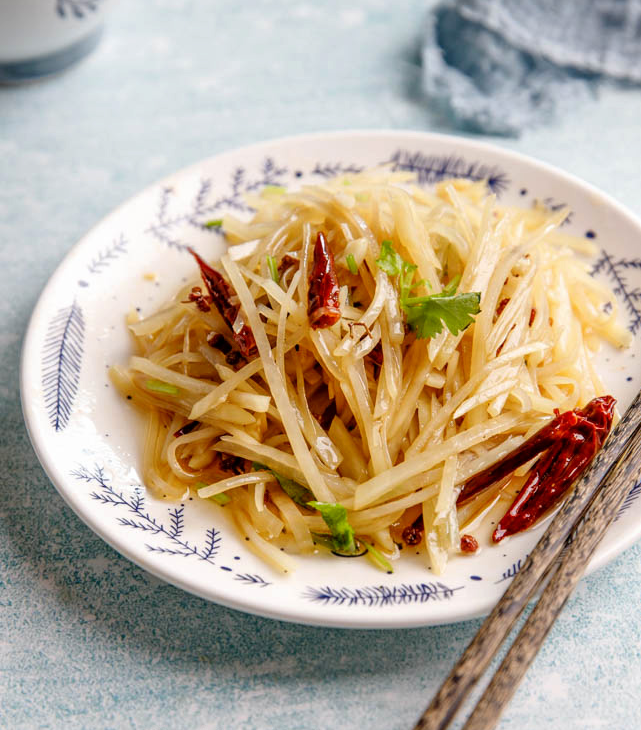
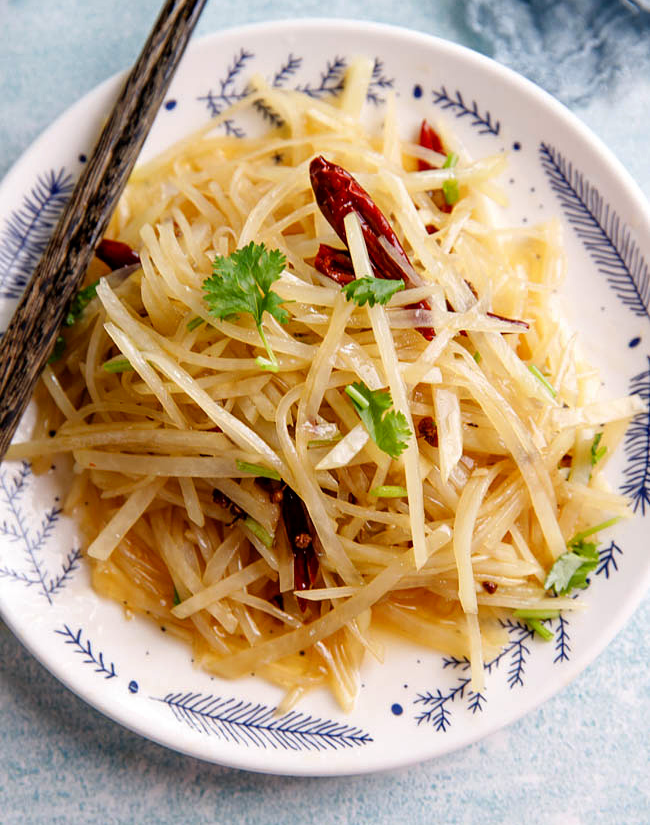
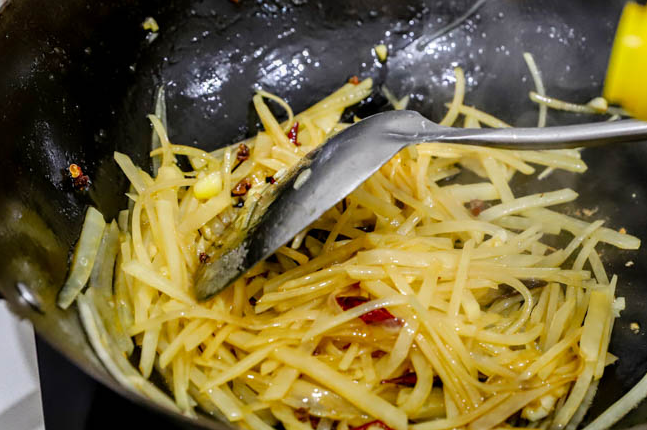
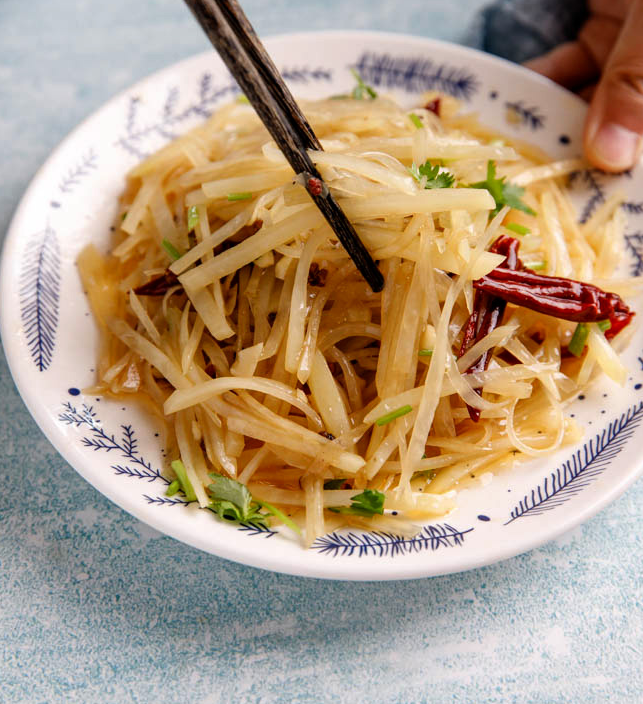
Spicy and Sour Shredded Potato
Spicy and sour shredded potatoes (TudouSi) is a humble and basic Chinese stir-fry dishes.
Cook’s Note
· Potatoes should be cut into shreds in similar sizes. The reason is different shred sizes requires different cooking time. So if we want to keep the cooking time precise, then cutting step is important. You can resort to some cutter if you do not like to cut shreds. In case you do want a try, here are some basic process, cut the potatoes into thin slices and arrange well as a slope and then further cut into shreds.
· Soak the shredded potatoes in clean water for around 10 minutes before frying to remove extra starch in the potatoes, making the shreds less sticky during the stir-fry process. Do remember to drain them before starting frying.
· Since acetic acid has strong volatility, in order to keep this dish sour, the vinegar should be added at the very end of the stir-frying process.
Ingredients
- 1 large potato (white or yellow)
- 2-4 dry chili peppers, cut into small shreds (removing the seeds if you do not want the dish too hot)
- 1 teaspoon Sichuan peppercorns
- ½ teaspoon of salt or as needed
- ½ tablespoon light soy sauce
- 2 garlic cloves, minced
- 2 teaspoons black vinegar
- 1 tablespoon vegetable cooking oil
- Chopped spring onion and coriander for garnishing
Steps
- Wash the potatoes and then cut into shreds of similar size.Prepare a clean bowl with clean water. Then soak the shredded potatoes in water for several minutes.
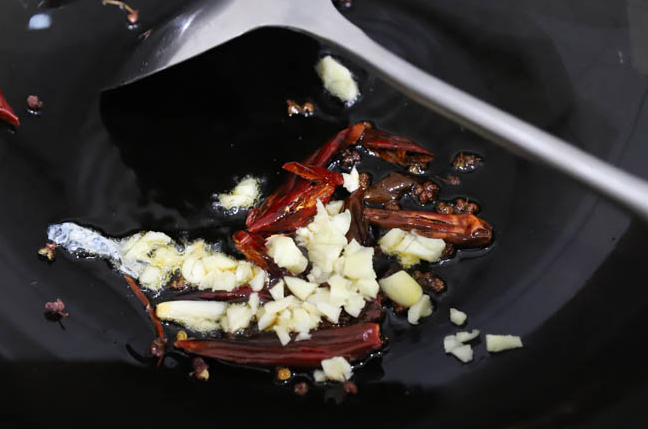
- Drain shredded potatoes and set aside. Heat up oil in pan, then put in chili red pepper, Sichuan pepper firstly and fry until aromatic and then place garlic in. Garlic can be burnt easily and bring a bitter taste of the dish. So garlic should be added after red pepper and Sichuan peppercorn are well fried.
- Add drained potatoes shreds, quick stir-fry until the potatoes shreds become soft. Add salt, soy sauce and black vinegar. Mix evenly.
- Transfer out and garnish some spring onion and coriander if you are using before serving.
Hope you enjoy and thanks for visiting!
Kam’s court, a chinese restaurant in Charmhaven, which was established in 1992. A friendly, family restaurant that has always been a good party place for family gatherings. We provide delicious and popular Chinese cuisine and are licensed. We invite you to come and enjoy our warm and friendly hospitality.

Pork Floss and Seaweed Pull-Apart Rolls
These pillowy, savory buns come from the tantalizing pages of Kristina Cho’s Mooncakes and Milk Bread: Sweet and Savory Recipes Inspired by Chinese Bakeries, a delicious homage to Chinese bakeries and their iconic confections. The buns get their ultrasoft pull-apart texture from tangzhong, a cooked paste of milk and flour incorporated into the dough that keeps the baked buns moist. They’re filled with pork floss (also known as pork sung), sweet and salty wisps of dried pork that resemble cotton candy and melt in the mouth. The combination of pork floss, mayo, and dried seaweed is popular in Chinese bakeries, and once you sink your teeth into one of these rich treats, you’ll know why.

Ingredients
Makes 8
Dough
1cup milk, divided
2Tbsp. plus 2⅔ cups (333 g) bread flour, divided, plus more for surface
1tsp. active dry yeast
A pinch plus ¼ cup (50 g) sugar
1large egg
½tsp. Diamond Crystal or ¼ tsp. Morton kosher salt
4Tbsp. unsalted butter, room temperature, cut into pieces
1tsp. vegetable oil
Filling and assembly
All-purpose flour or bread flour (for surface)
½cup mayonnaise, preferably Kewpie
1cup pork floss
¼cup thinly sliced scallions
2Tbsp. furikake
Nonstick vegetable oil spray
1large egg
1Tbsp. milk or heavy cream
1tsp. toasted sesame seeds
Preparation
Dough
· Step 1
Cook ¼ cup plus 3 Tbsp. milk and 2 Tbsp. bread flour in a small saucepan over low heat, whisking constantly, until thickened to a paste, 2–3 minutes. Transfer tangzhong to a small bowl and let sit until warm (it should resemble mashed potatoes), 5–10 minutes. Clean saucepan and reserve.
Step 2
Bring remaining ½ cup plus 1 Tbsp. milk to a gentle simmer in reserved saucepan over medium heat (watch carefully as milk tends to boil over). Pour milk into another small bowl and let cool until warm to the touch (about 110°). Stir in yeast and a pinch of sugar and let sit until foamy, 5–10 minutes.
Step 3
Combine egg, salt, remaining 2⅔ cups bread flour, and remaining ¼ cup sugar in the bowl of a stand mixer fitted with a dough hook. Add tangzhong and yeast mixture and mix on low speed until a shaggy dough forms. Add butter 1 piece at a time, mixing until fully incorporated after each addition before adding more. Increase speed to medium-high and continue to mix dough until tacky and slightly sticky, 8–10 minutes.
Step 4
Transfer dough to a lightly floured surface. Wet your hands to prevent dough from sticking, then pull and pinch ends of dough to form a smooth ball.
Step 5
Coat a large bowl with oil. Place dough in bowl and gently turn to coat. Arrange seam side down and cover bowl with plastic wrap. Let sit in a warm, draft-free spot until doubled in size, about 2 hours. (Alternatively, you can chill 8–12 hours).
· Filling and assembly
Step 6
Roll out dough on a lightly floured surface to about an 18×10″ rectangle. Using a small offset spatula, spread mayonnaise over surface of dough, leaving a ½” border around edges. Sprinkle 1 cup pork floss, then scallions and furikake evenly over mayonnaise. Roll up dough from a long side to form a tight log and pinch seams together to seal. Turn dough log seam side down and, using a sharp knife, trim 1″ off each end; discard. Slice log into 8 equal portions.
Step 7
Coat a 10″-diameter cake pan with nonstick spray. Arrange rolls in pan, leaving a small gap between each roll. Cover pan with a damp kitchen towel and let sit in a warm, draft-free spot until buns are doubled in size, 1–1½ hours.
Step 8
Preheat oven to 350°. Whisk together egg and milk in a small bowl. Lightly brush tops of rolls with egg wash, then sprinkle sesame seeds evenly over.
Step 9
Bake rolls until golden brown, 25–28 minutes. Transfer pan to a wire rack and let rolls cool in pan until warm, or serve room temperature.
Do ahead: Rolls can be baked 4 days ahead. Let cool completely; transfer to an airtight container and chill, or freeze up to 3 months. Reheat chilled buns in a 300° oven until soft and warmed through, about 5 minutes, or 30–45 seconds in a microwave. Frozen buns can be reheated on a baking sheet in a 350° oven 10–15 minutes.

Kam’s court, a chinese restaurant in Charmhaven, which was established in 1992. A friendly, family restaurant that has always been a good party place for family gatherings. We provide delicious and popular Chinese cuisine and are licensed. We invite you to come and enjoy our warm and friendly hospitality.
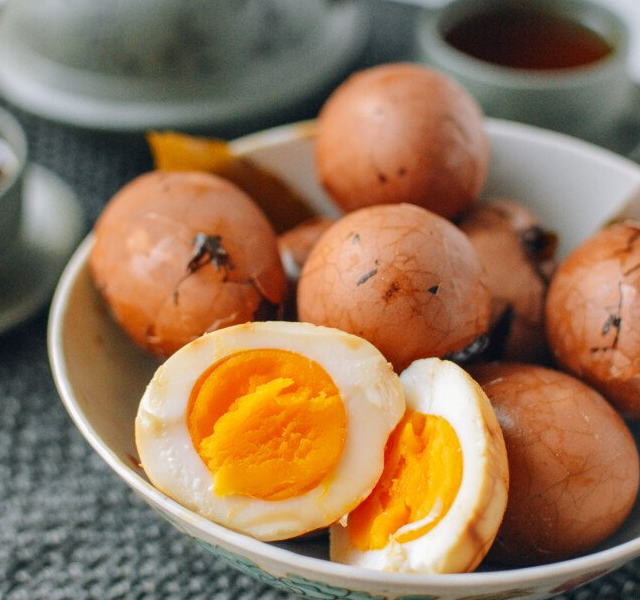
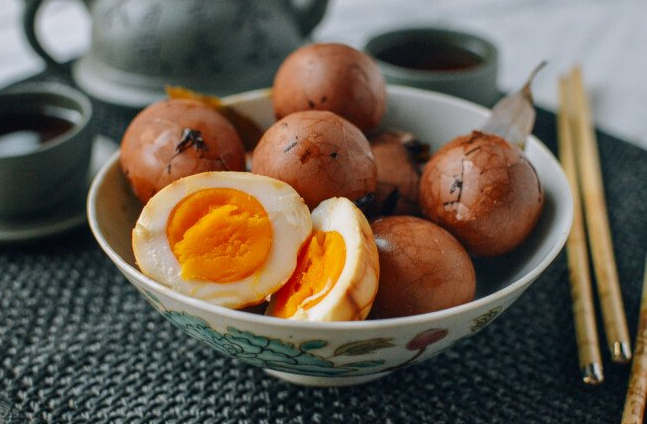
boiled egg in tea
Chinese tea eggs are a savory snack that you might find sold by street vendors across China (often in the morning, though you can also find them any time of day).
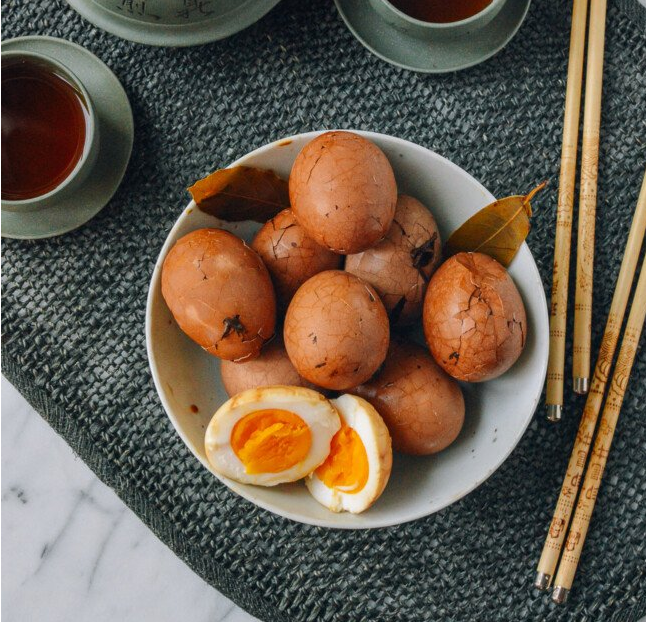
First, you hard-boil the egg. Then, you crack the shells to allow a briny tea and spice mixture to seep in to the egg within, creating a marble pattern and a tasty flavor.
How Cooked Should the Yolk Be?
Now, most tea eggs in China are cooked for quite a long time, long enough to really impart flavor to the egg. As a result, the yolk inside is often VERY cooked, rather than runny or bright orange, like you might find in a ramen egg.
This is the traditional way of making a tea egg, and some of us actually enjoy the crumbly texture of the cooked yolk.
However, some people aren’t a fan of that yolk texture or the green tinge that the outside of the yolk gets when cooked this long.
While we already posted a Chinese tea egg recipe years ago, in this version, I have a method for making Chinese tea eggs with softer yolks using a method similar to how you would make a Japanese ramen egg.
The cooking method is pretty ingenious, as these eggs turn out flavorful yet soft in the middle. I decided to borrow the technique and did a revamp on traditional Chinese tea eggs.
That said, if you want your tea eggs to be super traditional, you can cook them longer in the brine, which will yield a tastier egg, but with a very hard-cooked yolk. Simply follow our first tea egg recipe.
Whatever your preference, let’s learn how to make these Chinese tea eggs from scratch!
Chinese Tea Eggs: Recipe Instructions
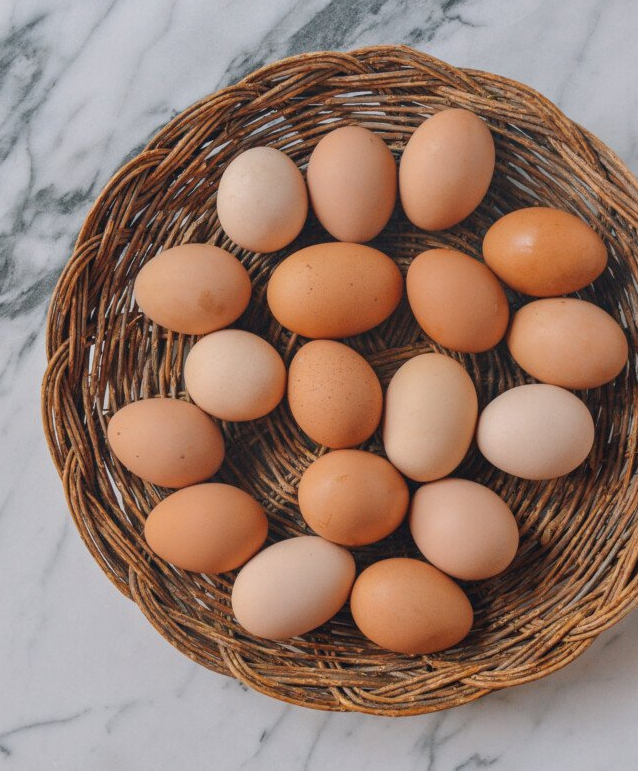
Bring the eggs to room temperature by leaving them out of the refrigerator for a couple hours.
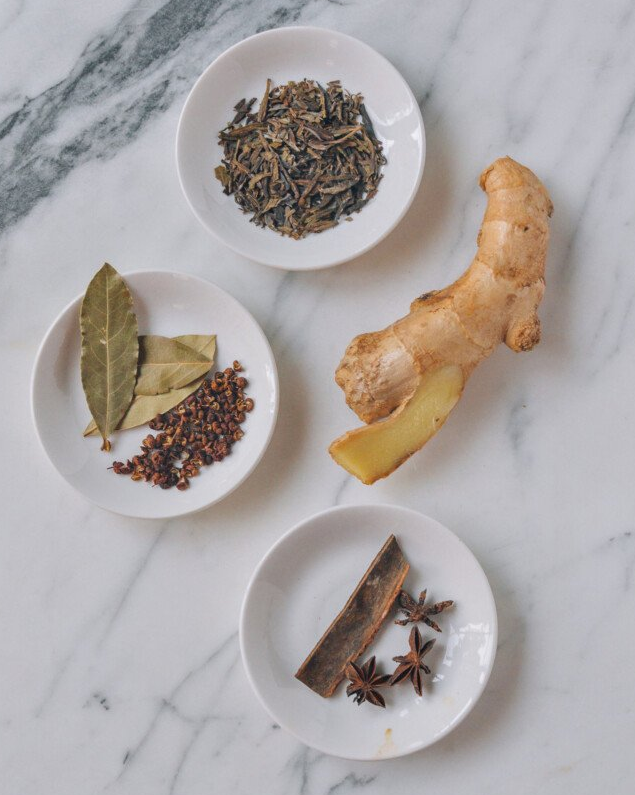
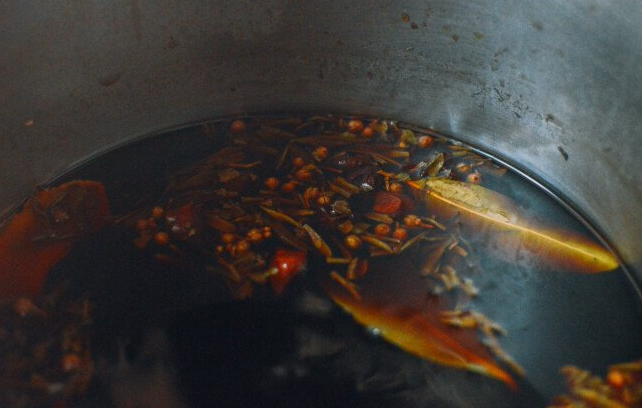
In the meantime, prepare the sauce base by adding the rest of the ingredients (the ginger, star anise, cinnamon stick, bay leaves, tea, Sichuan peppercorns, light soy sauce, dark soy sauce, sugar, salt, Shaoxing wine, and 4-5 cups water) to a medium pot.
Bring the mixture to a boil, and the turn the heat down to a simmer. Cover and simmer for 10 minutes. Then turn off the heat, open the lid, set it aside, and let it cool completely.
Bring another pot of water to a boil for the eggs. Once boiling, gently and quickly lower the eggs into the boiling water using a large spoon. You want to avoid dropping them and cracking them on the bottom of the pot.
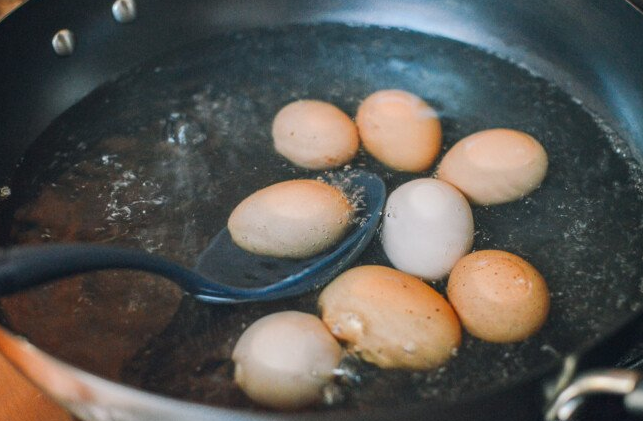
Let the eggs cook in the boiling water for 7 minutes (it’s a good idea to set a timer). Once the timer goes off, turn off the heat, quickly scoop out the eggs, and transfer to an ice bath. Allow them to sit in the ice bath until they are completely cool to the touch. The purpose here is to stop cooking the eggs any further.
Once the eggs are cooled, lightly crack the egg shells. The goal here is to make enough cracks to allow the flavor of the sauce base to seep into the egg. I like to use a small spoon to tap the eggs, but be careful!
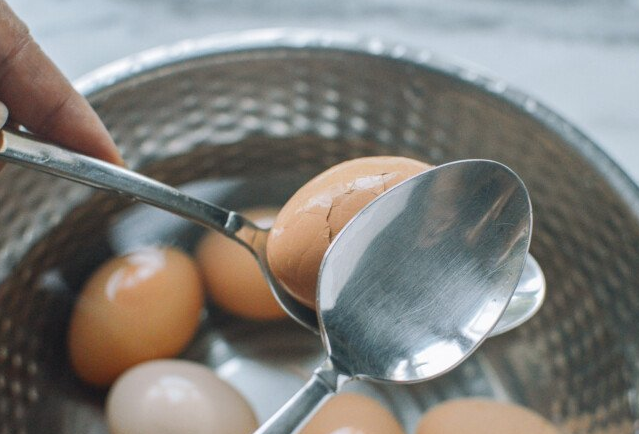
It you tap or crack too hard, you might crack open the egg, since the egg yolk is still very soft.
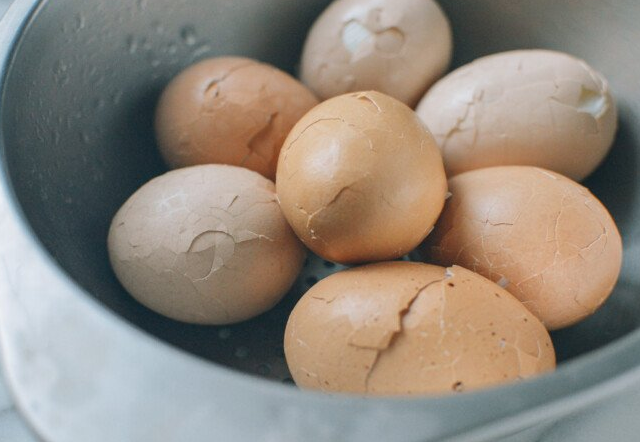
Soak the cracked eggs in your sauce base for 24 hours in the refrigerator, making sure all the eggs are completely submerged in the sauce base.
After 24 hours, they’re ready! You can also soak them longer for a stronger flavor. These Chinese tea eggs last for 3 to 4 days in the refrigerator.
Kam’s court, a chinese restaurant in Charmhaven, which was established in 1992. A friendly, family restaurant that has always been a good party place for family gatherings. We provide delicious and popular Chinese cuisine and are licensed. We invite you to come and enjoy our warm and friendly hospitality.