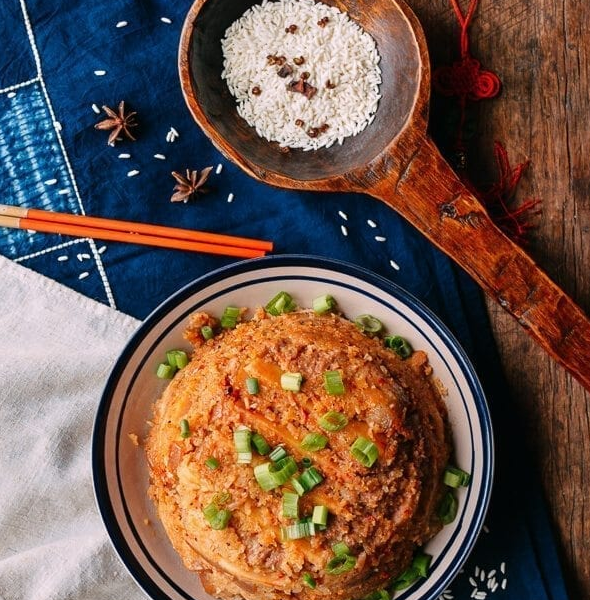
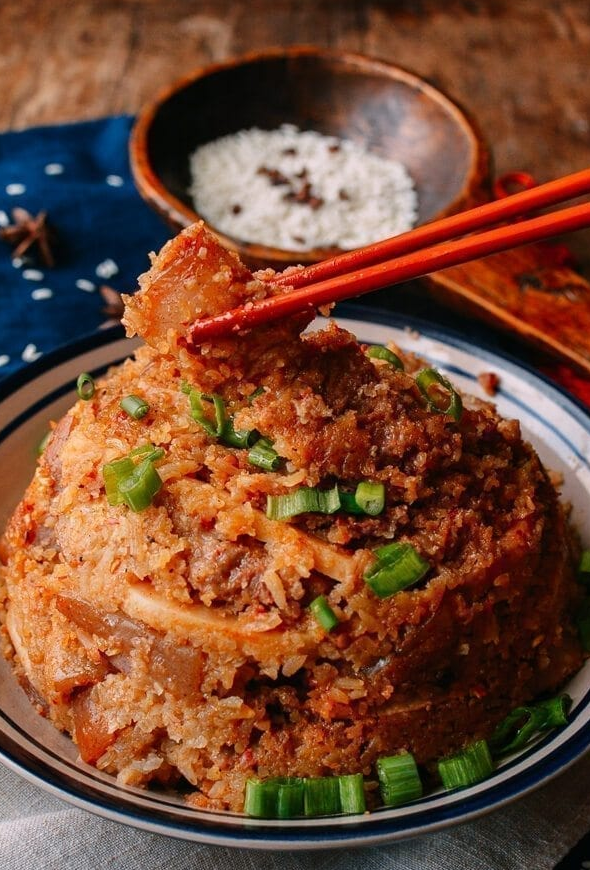
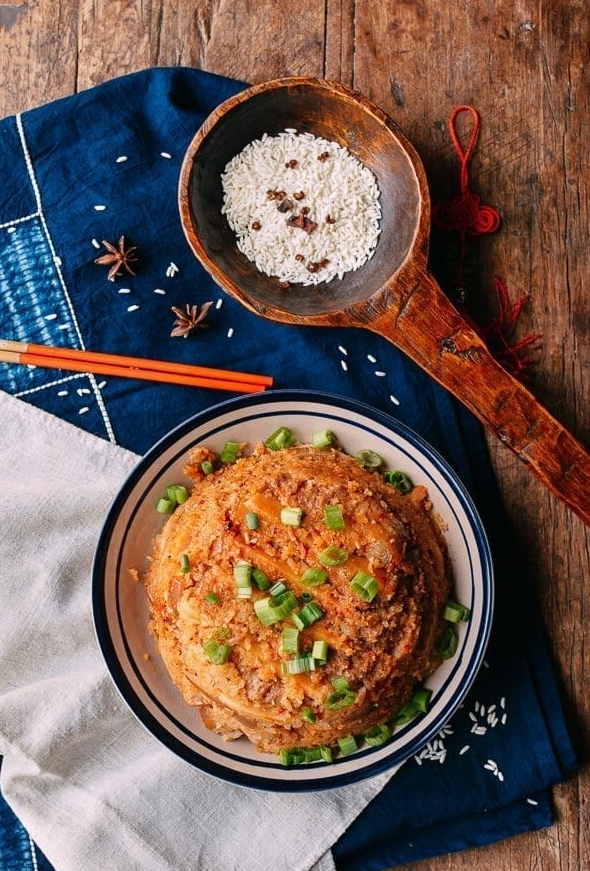
steamed pork with rice
Today, I want to talk about a distinctive Chinese New Year dish: Steamed Pork with Rice Powder, or Fen Zheng Rou .
This is not a dish that appears on restaurant menus. Not even in China. Nor is it a dish that appears regularly on home dinner tables. It IS a homestyle dish, but it’s reserved for special occasions like Chinese New Year and other holidays.
A Unique & Fragrant Dish
Fen Zheng Rou is popular in many parts of China, like Sichuan, Hubei, and Jiangxi. I don’t have too many memories from my earlier childhood growing up in Hubei, but I can still see the individual plates of Fen Zheng Rou revealing themselves as the chef lifted open the lid from the giant steamer at the village cafeteria during the holidays.
As the steam swirled upwards, the sight and the smell was incredible. It was one of those blissful moments that has stuck with me all these years later.
What makes this dish special is the spiced rice powder. The pre-packaged rice powder may be available at your local Asian stores, but you can make it at home just as easily.
Each region makes this dish slightly differently, varying the pork marinade, but the rice powder mixture and its preparation are pretty consistent. The coating of the spiced rice powder and a turn through the steamer results in a robustly flavored, nutty steamed pork belly with a silky texture.
For this dish, I used a piece of leaner pork belly with less fat, but the fat is much needed to help enrich the taro and the rice while steaming. A healthier option would be pork ribs; I’ve tried the recipe with both options, and they are both delicious. Moreover, if taro isn’t your favorite, this dish is also made with potatoes, pumpkin, and yams.
Recipe Instructions
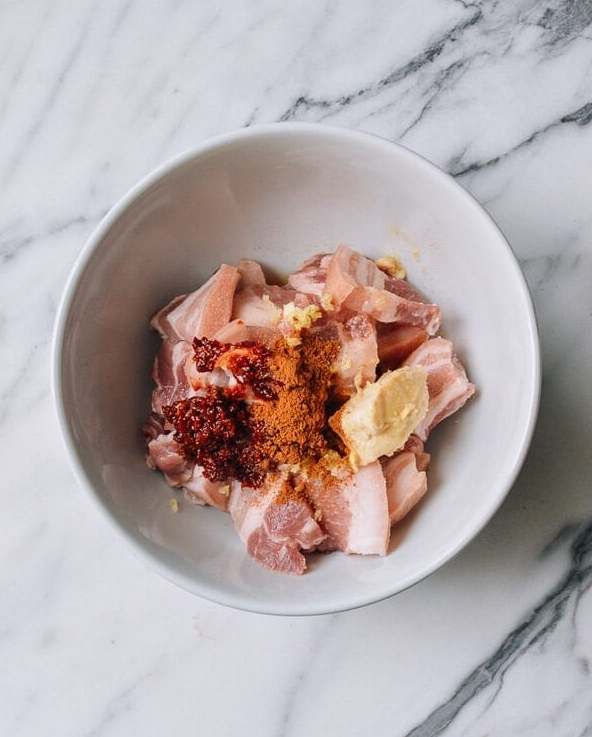
First, marinate the pork belly. Wash the pork belly and pat it dry with paper towels. Slice it into ¼-inch thick pieces. In a large bowl, mix the sliced pork belly with the minced ginger, Shaoxing wine, fermented bean curd (white or red), spicy bean sauce (or regular bean sauce), five spice powder, and sugar.
Use your hands to combine everything together well. Cover and marinate for about 1 hour in the refrigerator.
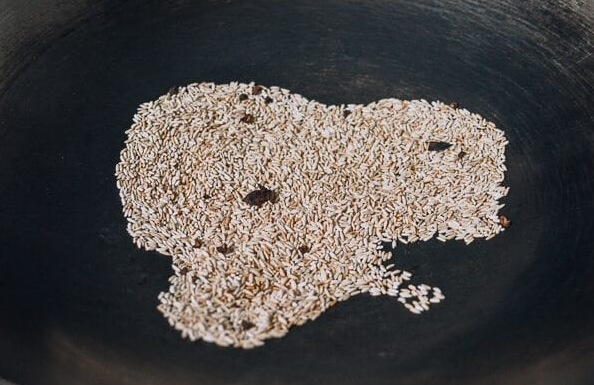
While the pork is marinating, prepare the rice mixture. In a clean, dry wok over medium-low heat, add the long grain rice, sweet rice, Sichuan peppercorns, and the star anise.
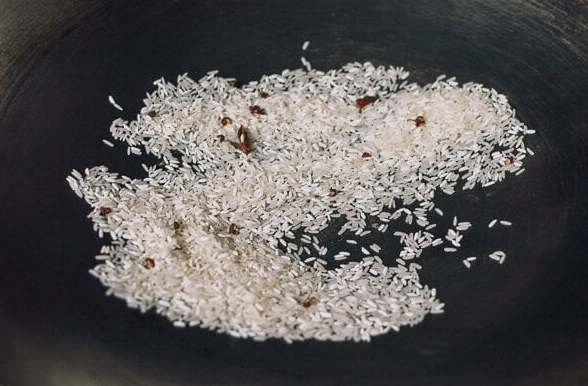
Cook it for about 5 minutes until the rice turns a light brown color. After 5 minutes, turn off the heat, and let the mixture cool slightly.
Next, use a food processor or mortar and pestle to mill the mixture into a coarse grind. When using the food processor, pulse the mixture a couple of times. The rice shouldn’t be too finely ground.
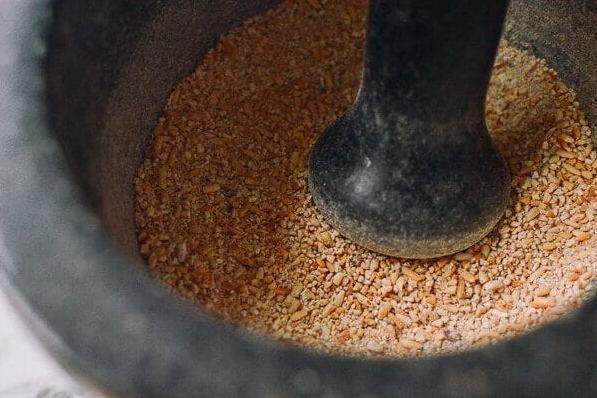
It’s also a great idea to double or triple the rice mixture, and store the leftovers in the refrigerator, so it’s readily available if and when you want to make this steamed pork dish again. The rice mixture should last a few months in the fridge.
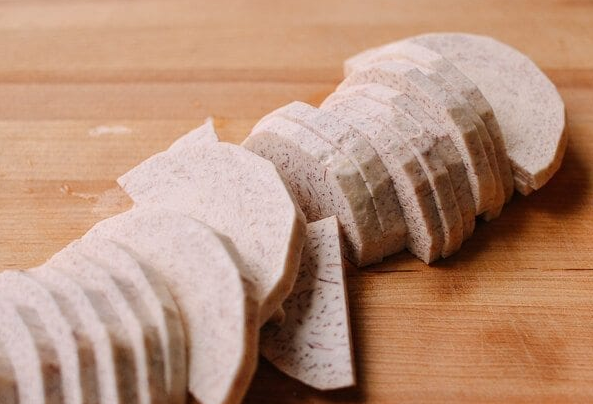
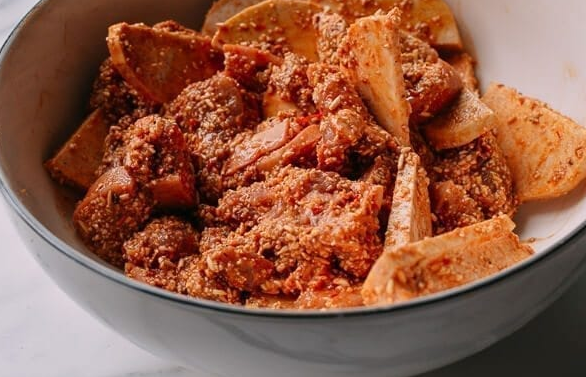
Next, we’ll assemble and cook the dish. Peel the taro skin, rinse, and cut it into pieces roughly the same size as the pork belly pieces.
Add the taro to the marinated pork. In a different bowl, mix the ground rice mixture with ½ cup water to create a thick paste. Then combine the rice paste with the marinated pork belly, taro, and 2 teaspoons of light soy sauce.
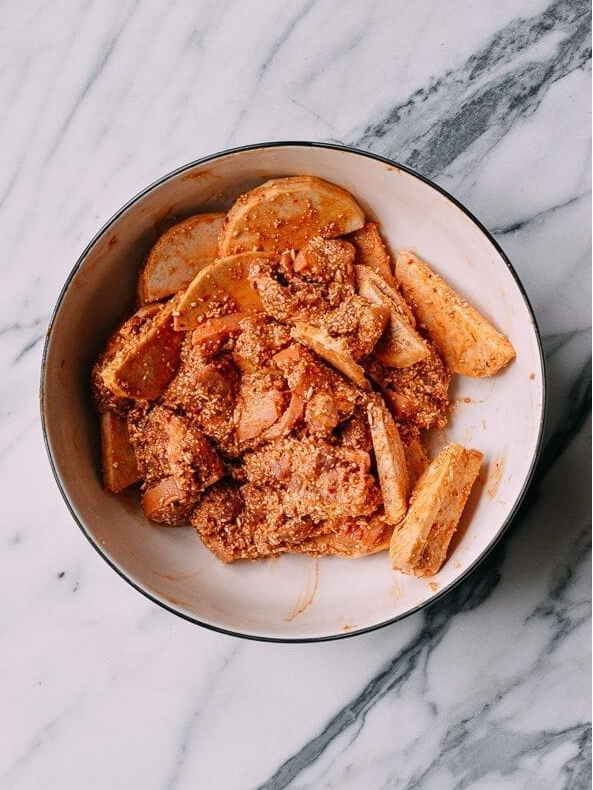
Transfer the mixture to a heat-resistant bowl or casserole dish that will fit into a steamer. Remember that the ground rice will expand after steaming, so make sure the dish is big enough. You can arrange the dish neatly like I did, or not–it won’t affect the taste!
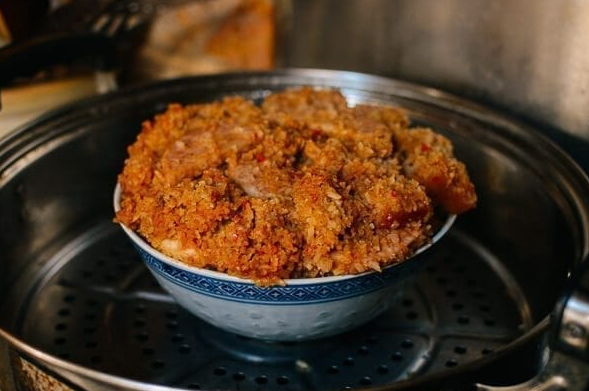
Prepare your steamer, filling it with 2-3 quarts of water. See our post on how to set up a steamer if you’re not familiar with steaming foods in Chinese cooking.
Set the dish in the steamer, and cover it tightly with the lid. Bring the water to a boil using high heat, then turn the heat down to medium low, and steam the pork and taro for 70 to 90 minutes. Periodically check the steamer to make sure the water hasn’t burned off.
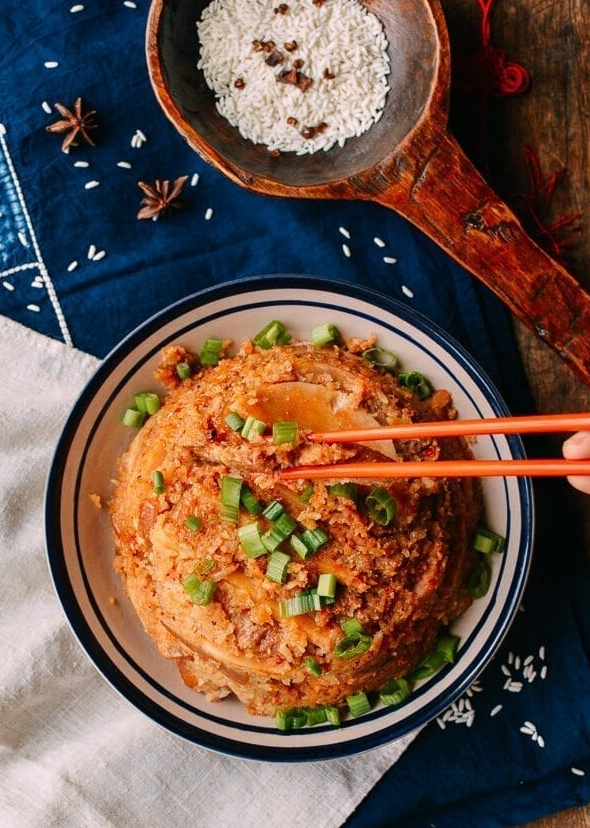
Garnish with chopped scallions and serve your steamed pork Fen Zheng Rou hot from the steamer!
Kam’s court, a chinese restaurant in Charmhaven, which was established in 1992. A friendly, family restaurant that has always been a good party place for family gatherings. We provide delicious and popular Chinese cuisine and are licensed. We invite you to come and enjoy our warm and friendly hospitality.
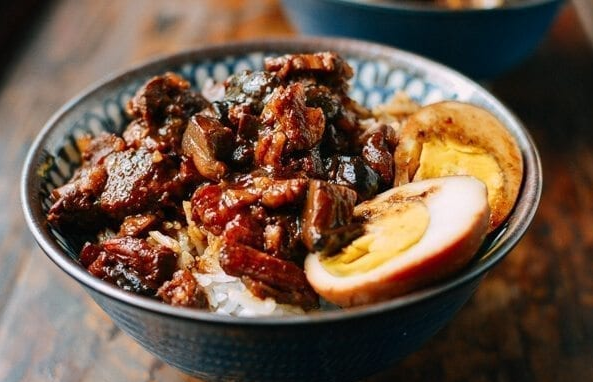
Taiwanese Braised Pork Rice Bowl
Lu rou fan is one of THE most beloved Taiwanese comfort foods. Second only perhaps to a piping bowl of beef noodle soup (and even then, a very close second).
The dish is a bit similar to the traditional Shanghainese dish, hong shao rou, or red cooked pork. We love that dish so much that we have TWO recipes for it. My Shanghai pork belly recipe, and my mother’s old school Shanghai pork belly recipe. The difference is in the aromatics and spices used, as well as the size at which the pork belly is cut. While hong shao rou involves big, luscious chunks of pork belly, lu rou fan is almost like a braised meat sauce.
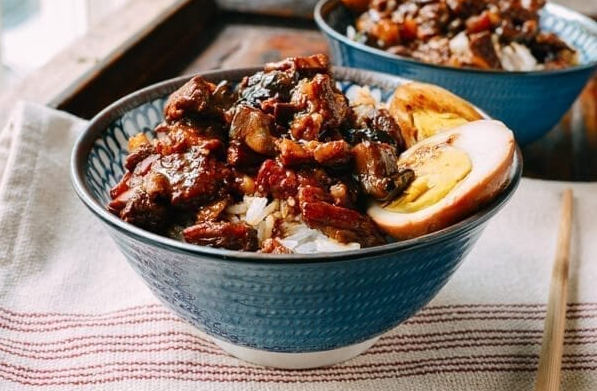
In the old days, eating meat was often a luxury. How does one feed an entire family in the rare moment one has a small piece of pork to work with? You cut it into small pieces, braise it for a long time to create a savory braised meat sauce that’s bursting with flavor, and mix it with lots of steaming, comforting rice so the whole family can enjoy it.
Okay, before we start, I want to point out a few things:
Use pork belly with skin, and don’t shy away from the fat. We’re going traditional here, and this is not a dish for dieters or low-fat substitutes. We have lots of other recipes for those looking for healthier options. Check out the vegetarian section!
You can use fresh or dried shiitake mushrooms. Dried shiitakes will be stronger in flavor.
You can braise the meat longer if you like; it’s the perfect dish to make in a slow-cooker, if that’s your kind of thing.
Use the lowest heat possible while simmering. At the end, you’ll want to thicken the sauce over higher heat, but you don’t want it to dry up.
Lu Rou Fan (Taiwanese Braised Pork Rice Bowl): Recipe Instructions
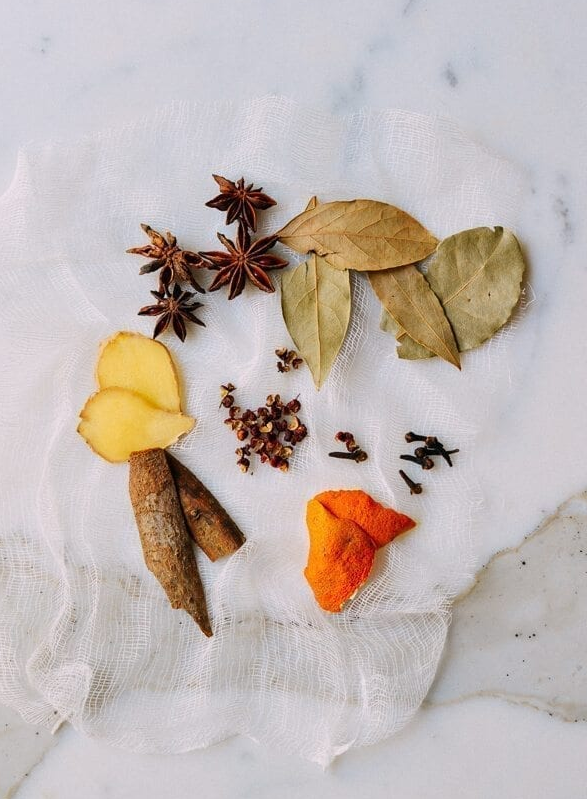
Make a spice packet by tying the following ingredients in a piece of cheesecloth with kitchen string: star anise, Chinese cinnamon stick, cloves, bay leaves, Sichuan peppercorns, dried tangerine peel, and ginger.
Bring a medium pot of water to a boil (enough so that the pork belly will be fully submerged), and blanch the chopped pork belly for 1 minute. Drain, rinse clean of any scum, and set aside.
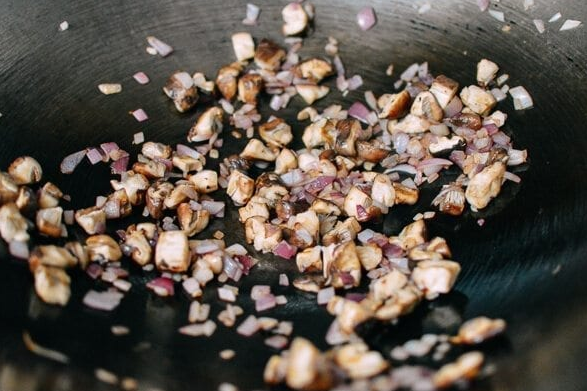
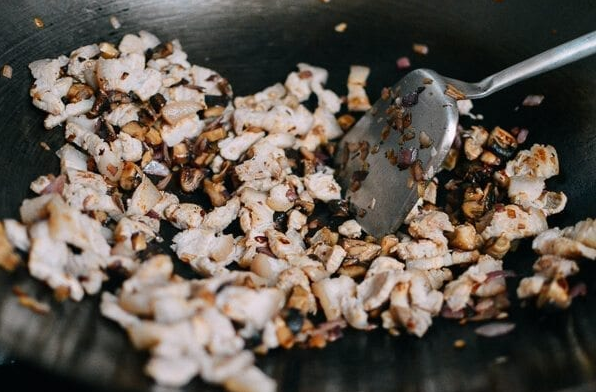
Heat the oil in a wok over low heat, and add the rock sugar (or granulated sugar). Cook the sugar until it starts to melt and then add the onions or shallots. Turn up the heat to medium high and stir-fry for 1 minute. Add the shiitake mushrooms and stir-fry for another couple minutes.
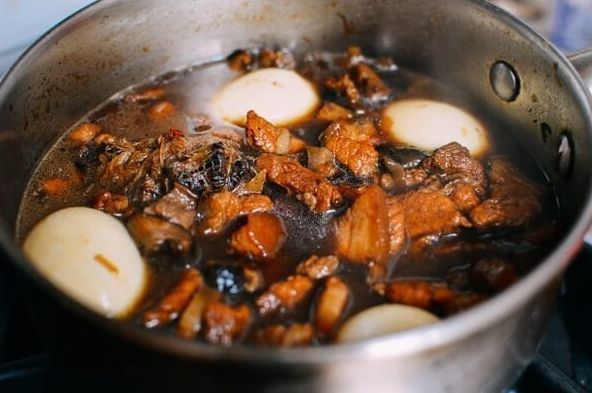
Add the blanched pork, shaoxing wine, light soy sauce, dark soy sauce, and water.
Stir and bring the mixture to a boil. Once boiling, add the spice packet, along with the peeled hardboiled eggs and turn the heat to the lowest setting. Simmer for 1 1/2 hours, stirring occasionally to prevent sticking.
At this point the meat should be fall-apart tender.
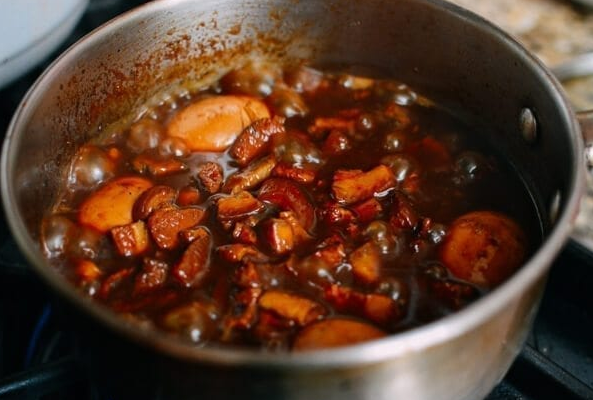
To finish the dish, remove the spice packet and turn up the heat to medium high to thicken the sauce, stirring occasionally. This process should take about 5-minutes. The sauce should be thick enough to coat a spoon, but there should still be plenty of it left. Serve over steamed white rice.
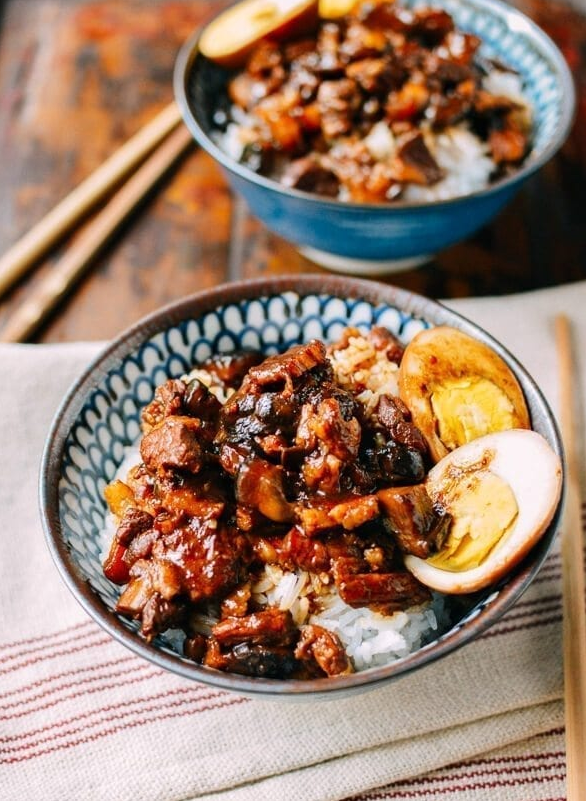
In the meantime, make plenty of rice and most importantly: don’t forget to share this favorite Taiwanese braised pork belly rice bowl!
Kam’s court, a chinese restaurant in Charmhaven, which was established in 1992. A friendly, family restaurant that has always been a good party place for family gatherings. We provide delicious and popular Chinese cuisine and are licensed. We invite you to come and enjoy our warm and friendly hospitality.
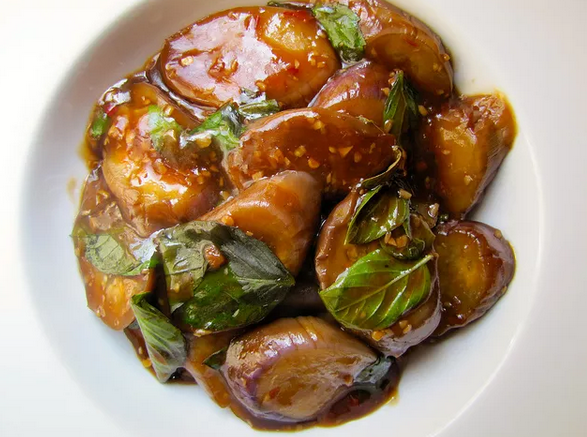
Braised Eggplant With Garlic and Basil Recipe
- Sourcing slender Asian eggplants ensures the finished dish has a tender, supple texture and no trace of bitterness.
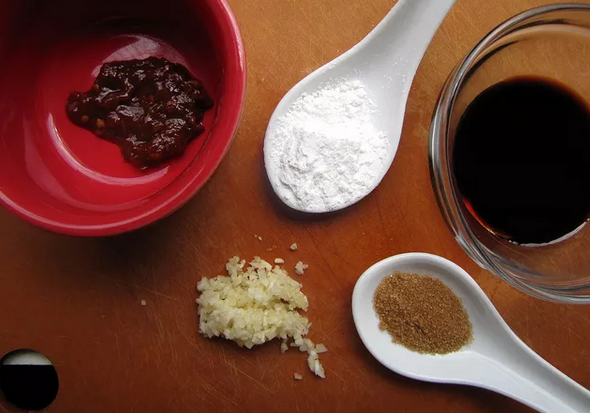
- Fermented Sichuan chile-bean paste (doubanjiang) and soy sauce add savory depth to the sauce, which is absorbed by the eggplant as it braises.
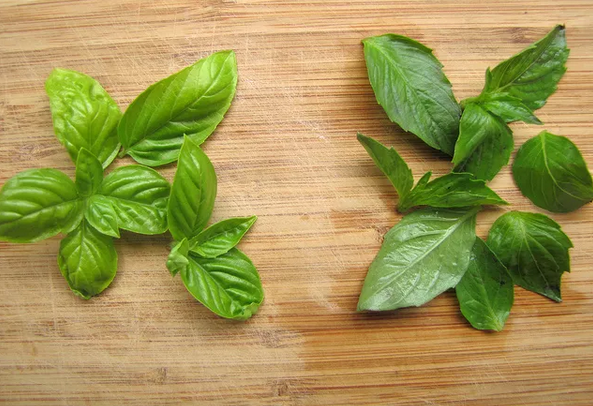
- Garnishing the eggplant with Thai basil adds a subtle anise note to the dish.
braising eggplant until just soft and thoroughly flavored is not a common technique in Western-style cooking routines. But in Asia, where eggplant varieties tend toward long and slender shapes like zucchini, it’s ubiquitous, often featured in stir-fries and curries. A typical Sichuan braised eggplant, for example, infuses the sliced discs with plenty of garlic in a chile bean- and soy-based sauce. So, how to improve upon a classic like this? The dish reaches new heights of flavor when finished with a peppery kick of Thai basil.
Like many of its Southeast Asian neighbors, Taiwan shares a penchant for basil—there’s basil tossed in with tofu, with clams, and, most famously, chicken. I’ve never enjoyed eggplant as much as I have in Taiwan, thanks to this unexpected flourish. The island also has culinary influence from Sichuan province, as evidenced in the use of the intensely umami fermented bean and chile sauce, or doubanjiang. Savory, spicy, slightly sweet, and somehow refreshing, this eggplant combination is satisfying enough to elevate it from a mere side dish to a vegetarian main course.
Unlike the common Genovese basil varietal found in the States, Thai basil is a slightly serrated-leafed herb with a somewhat more peppery, anise-tinged flavor. That said, they’re pretty similar, and can be used interchangeably. Can you tell which basil is which?
I’m sure you’re wondering whether you can use common, large eggplant in place of Asian eggplants for this recipe. You can… but let me briefly explain: Asian eggplants are just superior to common eggplants in so many ways. What? If you agree that the most succulent part of eggplant is neither the skin nor the mushy seed pocket, but the flesh in between, then due to their longer, thinner shape, Asian eggplants just have more of it. (Imagine a cucumber shaped like a watermelon.) Plus, their skin is thin enough to skip peeling. Neat slices of them also cook evenly, with equal proportions of skin and seed in each, and won’t fall apart as easily as big eggplant chunks. Also, the flesh isn’t bitter enough to prompt some cooks to salt and drain it prior to cooking.

Lastly, since eggplant is available in so many shades, stripes, and sizes at farmers’ markets, there’s no reason not to opt for an Asian eggplant if you’re reading this during the summer months. To be sure, “Asian eggplant” refers to a broad category of varieties, some more deeper-colored or curled than others. The typical variety common in Chinese cuisine is a rather large and tube-like eggplant, with neon orchid-purple skin. But for the sake of simplicity (and to exclude the tiny, round Thai eggplants, which feature a different texture altogether), we’ll call all these slender varieties “Asian,” and fair game, here.
This dish is very easy to make, for all its range of flavors. You can even add a protein, like sliced chicken breast or tofu, or toss in more colorful vegetables (carrots and snap peas would go nicely). Just be sure to braise the eggplant partway, first. As the sauce bubbles away, the eggplant pieces will absorb it like sponges, rendering them soft and richly flavorf.
Ingredients
- 1/4 cup light soy sauce
- 1 teaspoon sugar
- 2 teaspoons chile bean sauce
- 1 teaspoon cornstarch
- 3 tablespoons vegetable or peanut oil
- 2 medium cloves garlic, minced (about 2 teaspoons)
- 1 pound Chinese eggplant (about 2 large), sliced into 1/2-inch disks (see notes)
- 1/4 teaspoon salt
- 1/4 cup fresh basil leaves (preferably Thai basil)
Directions
- Combine 1 1/2 cups water, soy sauce, sugar, and chile bean sauce in a small bowl and stir. Combine 1/4 cup water and cornstarch in a separate bowl.
- Heat oil over medium-high heat in a large fry pan or Dutch oven until shimmering. Add garlic and eggplant and sprinkle with salt. Cook, stirring occasionally, until lightly softened and fragrant, about 2 minutes.
- Stir in the water, soy sauce, sugar and chili bean sauce mixture. Bring to a boil. Reduce heat to a gentle but consistent simmer and cook, uncovered, stirring or flipping eggplant occasionally, until eggplant slices are tender and liquid has reduced by about half, about 15 minutes.
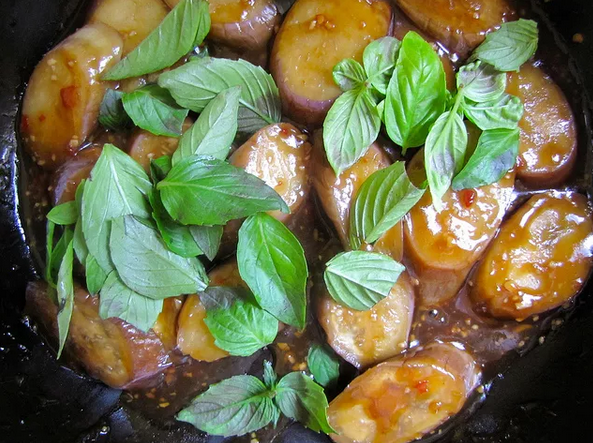
- Stir the cornstarch and water mixture in its bowl to loosen it up. Stir it into the pan with the eggplant and allow it to thicken. Taste for seasoning, adding any extra salt, soy sauce, chili sauce, or sugar as desired. Remove from heat and stir in whole basil leaves. Serve immediately.
Kam’s court, a chinese restaurant in Charmhaven, which was established in 1992. A friendly, family restaurant that has always been a good party place for family gatherings. We provide delicious and popular Chinese cuisine and are licensed. We invite you to come and enjoy our warm and friendly hospitality.
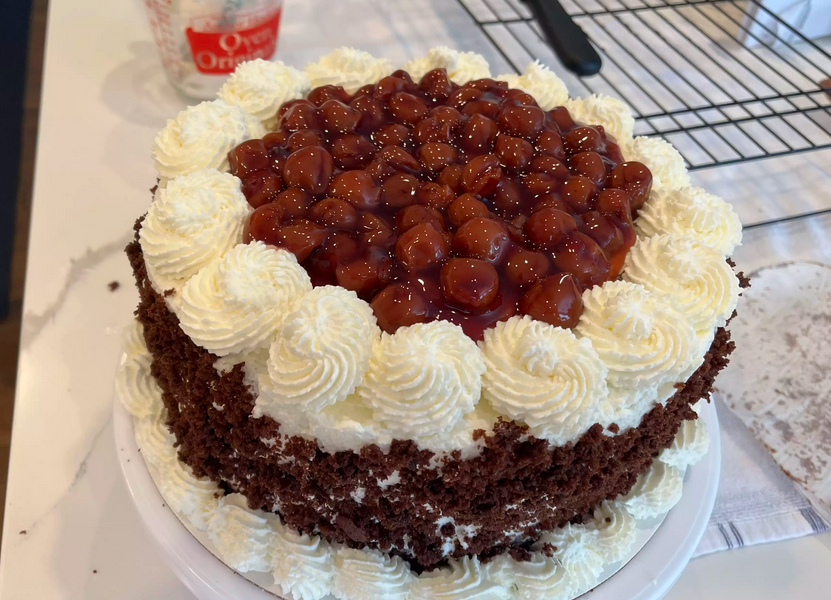
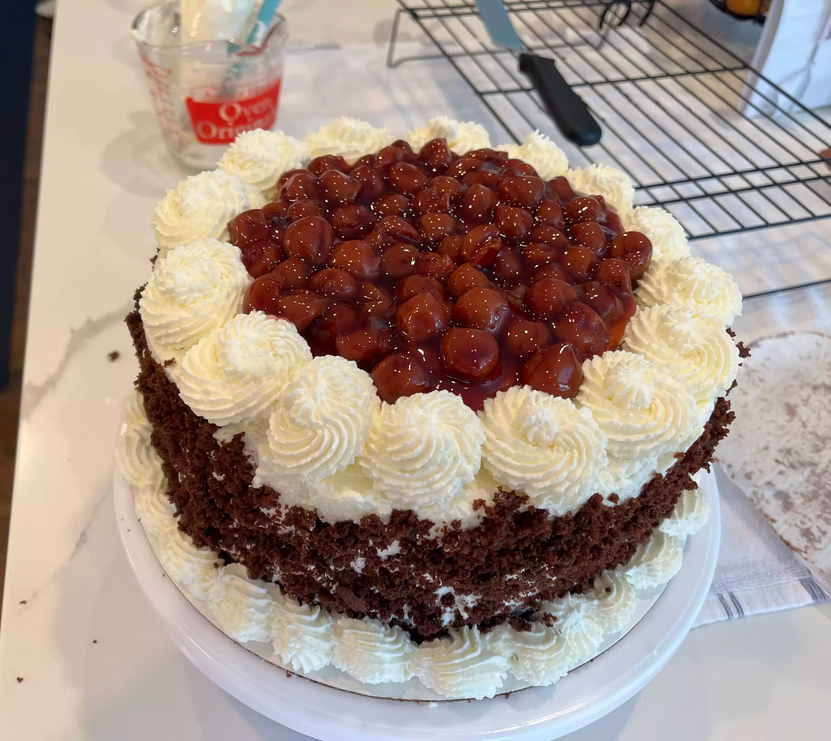
Black Forest Cake
Ingredients
Cake:
· 2 ⅛ cups all-purpose flour
· 2 cups white sugar
· ¾ cup unsweetened cocoa powder
· 1 ½ teaspoons baking powder
· ¾ teaspoon baking soda
· ¾ teaspoon salt
· 3 eggs
· 1 cup milk
· ½ cup vegetable oil
· 1 tablespoon vanilla extract

Topping:
2 (20 ounce) cans pitted sour cherries
1 cup white sugar
¼ cup cornstarch
1 teaspoon vanilla extract
Frosting:
· 3 cups heavy whipping cream
· ⅓ cup confectioners’ sugar
Directions
· Preheat the oven to 350 degrees F (175 degrees C). Grease and flour two 9-inch round cake pans; line bottoms with parchment paper. Place a medium bowl in the refrigerator to chill.
· Whisk flour, sugar, cocoa, baking powder, baking soda, and salt together in a large bowl. Add eggs, milk, oil, and vanilla; beat until combined. Pour cake batter into the prepared pans.
· Bake in the preheated oven until a toothpick inserted in the centers comes out clean, about 35 minutes. Cool layers in pans on wire racks for 10 minutes. Run a paring knife around edges to loosen and invert carefully onto racks to cool completely, 1 to 2 hours.
· While cake layers bake, drain cherries for topping, reserving 1/2 cup juice. Combine reserved juice, cherries, sugar, and cornstarch in a 2-quart saucepan. Cook, stirring constantly, over low heat until thickened. Stir in vanilla. Let cool at room temperature for 30 minutes. Transfer to the refrigerator to cool completely before assembling cake.
· Combine whipping cream and confectioners’ sugar for frosting in the chilled medium bowl. Beat with an electric mixer at high speed until stiff peaks form.
· Split each cake layer in half horizontally using a long serrated knife. Tear one layer into crumbs; set aside. Gently brush loose crumbs off top and sides of remaining layers using a pastry brush or your hands. Reserve 1 1/2 cups frosting for piping decorations on cake; set aside.
· To assemble, place one cake layer on a cake plate. Spread with 1 cup frosting; top with 3/4 cup cherry topping. Top with second cake layer; repeat layers of frosting and cherry topping. Top with third cake layer and frost sides of cake.
· Pat reserved cake crumbs onto sides of cake. Spoon reserved 1 1/2 cups frosting into a pastry bag fitted with a star decorator tip. Pipe around top and bottom edges of cake. Spoon remaining cherry topping on top of cake.
· Store covered in the refrigerator until ready to serve.
Kam’s court, a chinese restaurant in Charmhaven, which was established in 1992. A friendly, family restaurant that has always been a good party place for family gatherings. We provide delicious and popular Chinese cuisine and are licensed. We invite you to come and enjoy our warm and friendly hospitality.
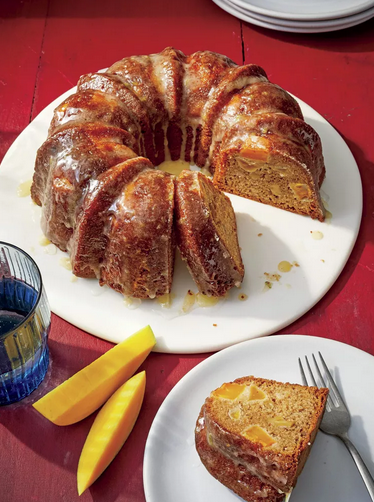
Mango Cake Recipe
Ingredients
Cake
- 4 large eggs
- 1 cup granulated sugar
- 1/2 cup vegetable oil
- 1/2 cup honey
- 2 cups all-purpose flour
- 2 teaspoons baking powder
- 2 teaspoons ground cinnamon
- 1 teaspoon ground nutmeg
- 1/2 teaspoon baking soda
- 2 cups diced fresh mango (from 1 mango)
- 1 cup chopped walnuts or pecans
- 1/2 cup golden raisins
- 1 tablespoon orange zest (from 1 orange)
- 2 teaspoons lime zest (from 2 limes)
Topping
- 1/2 cup sifted powdered sugar
- 1 teaspoon orange zest plus 1⁄4 cup fresh juice (from 1 orange)
- 1/2 teaspoon lime zest plus 2 tsp. fresh juice (from 1 lime)
Directions
· Prepare the Cake: Preheat oven to 325°F. Lightly oil and flour a 14-cup Bundt pan. Beat eggs in bowl of a stand mixer on medium speed until fluffy, 4 to 5 minutes. Beat in sugar until combined; then beat in oil until combined. Gradually beat in honey.
· Whisk together flour, baking powder, cinnamon, nutmeg, and baking soda in a separate bowl. Add flour mixture, ½ cup at a time, to egg mixture, beating just until blended after each addition. Stir in mango, nuts, raisins, orange zest, and lime zest. Pour batter into prepared pan.
· Bake in preheated oven until a wooden pick inserted in center comes out clean, 50 to 55 minutes. Remove to a wire rack, and let stand in pan 10 minutes.
· Prepare the Topping: While the Cake stands in pan, stir together powdered sugar, orange and lime zest, and orange and lime juice until combined. Invert Cake onto a plate. Drizzle Topping evenly over warm inverted Cake. (Or make a glaze, stirring together about 1 cup sifted powdered sugar and 1 tablespoon fresh orange juice; pour over cooled Cake.)

Kam’s court, a chinese restaurant in Charmhaven, which was established in 1992. A friendly, family restaurant that has always been a good party place for family gatherings. We provide delicious and popular Chinese cuisine and are licensed. We invite you to come and enjoy our warm and friendly hospitality.
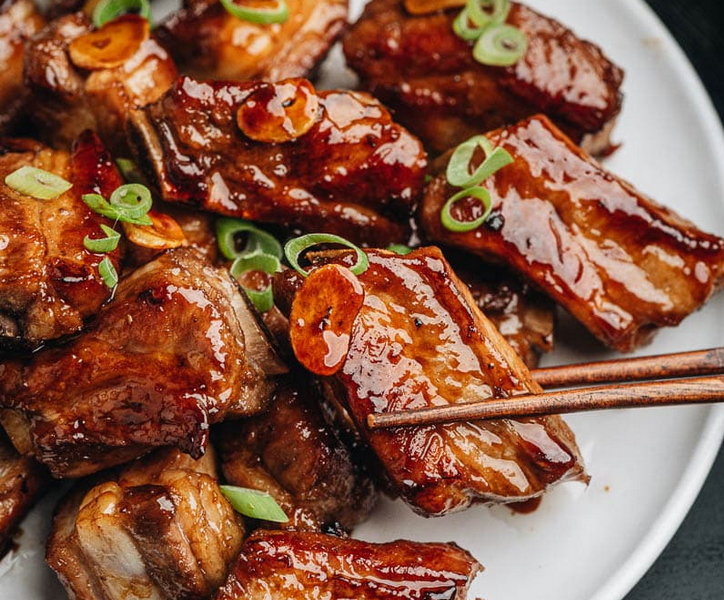
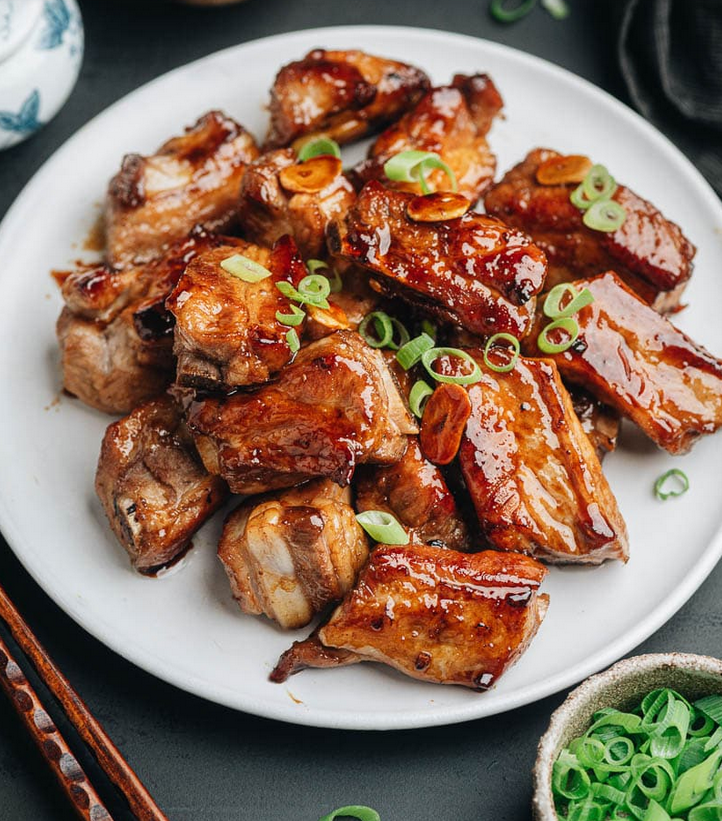
Sweet and Sour Ribs
Sweet and sour ribs is a classic Shanghainese appetizer that will be the highlight of your dinner table. The ribs are browned with sugar until crispy and caramelized, then finished up in a sticky and fragrant sweet and sour sauce.
What is sweet and sour ribs
Sweet and sour ribs (tang cu xiao pai) is a famous dish from Shanghai cuisine. The small pork ribs are fried until golden crispy, then coated with a thin layer of sticky sweet and sour sauce. The ribs have a special chewy texture and a crunchy caramelized surface, and they’re bursting with flavor. The dish can be served hot or cold, usually in small quantities as an appetizer.
Why this recipe
There are a few different approaches to recreating this dish at home. For example, the traditional way is to marinate, deep fry, and then cook the ribs with the sauce. However, I found the approach below is slightly easier and yields a great result:
- Blanch the ribs with aromatics to get rid of any gamey taste, and quickly cook through the interior.
- Brown the ribs using the melted sugar method (more details below) for the caramelized texture.
- Stir the ribs with the sauce to finish up.
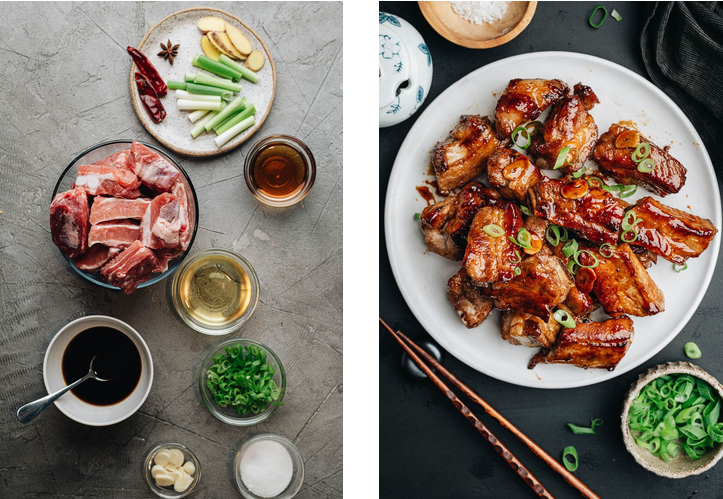
Ingredients for sweet and sour ribs
This sweet and sour ribs recipe requires a few very simple ingredients.
What type of pork ribs to use
The most important thing for sweet and sour ribs is to use the correct type of pork ribs. To mimic the authentic restaurant dish, you should use 2” (5 cm) long small single riblets. Spare ribs work better than baby back ribs because they have a thinner layer of meat. The thin layer will cook better in this recipe because the meat will cook through more quickly and yield a better texture given the short cooking time.
You can usually find this type of ribs at Asian markets, especially Chinese and Korean markets (like H Mart). They are often sold in fully cut-up form in a package. Either that, or a slab of partial ribs that is cut crosswise.
If you do not have access to an Asian market, it’s possible to buy a slab of regular spare ribs. And you could ask the butcher to slice the ribs crosswise using their saw. Then you only need to cut them into single riblets at home, which is quite easy to do with your regular knife.
It is also possible to use whole riblets without cutting them short. In this case, try to find a smaller slab with flat ribs, which will be easier to brown.
The sauce
The sweet and sour sauce is made of three simple ingredients:
Soy sauce
Chinkiang vinegar
Sugar
Mise en place
Once you’re ready to cook, your table should have:
- Aromatics for braising (green onion, ginger, star anise, dried chili pepper)
- Shaoxing wine
- Pork ribs
- Measured out oil (it’s important to measure the oil in this recipe)
- Mixed sauce
- Sliced garlic
- Sugar
- Sliced green onion for garnish
How to cook sweet and sour ribs
The melted sugar browning method
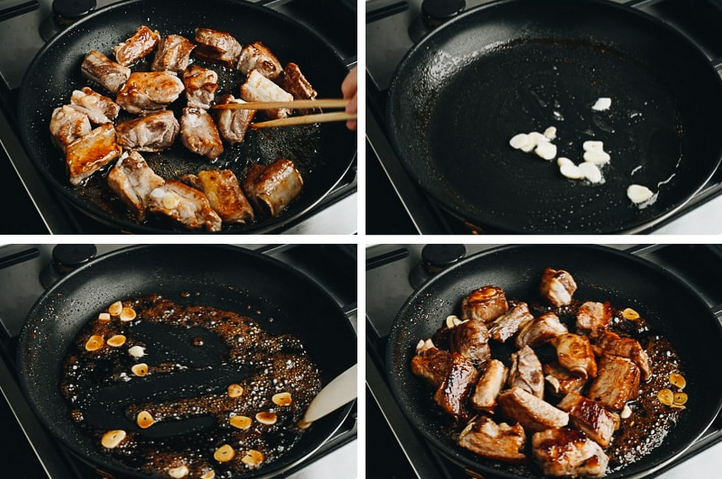
(chao tang shai), or browning meat in melted sugar, is a cooking technique that is widely used in Chinese stir fries and braised dishes, to create a special texture to the surface. Different from browning the meat directly in hot oil, the melted sugar adds a beautiful golden color to the meat, and creates a light caramelized and crispy texture, along with a slightly sweet taste. For example, the popular red braised pork uses this method to brown the meat before braising. You start by adding sugar to cold oil. Cook it slowly until the sugar melts and turns golden. It’s important to get a proper oil temperature without burning the sugar. Then the pork is then added for a quick stir fry. You will find that the pork gets a nice beautiful reddish golden color in a minute or so, along with the caramelization of the sugar.
What pan to use
In Chinese restaurants it’s common practice to use a wok to melt the sugar. Because of the round shaped wok bottom, the sugar will be submerged in the oil and melt more evenly. In a US home kitchen, I found a nonstick pan works better. Because: If you do have a wok, it’s very likely that it’s a flat-bottomed wok. In that case, it doesn’t help with the melted sugar process that much (I’ve tested it) If you use a carbon steel or cast iron wok, the surface will react with the vinegar in the sauce, which will cause the wok seasoning to fade. When using a nonstick pan, the biggest challenge is to disperse the oil and sugar as evenly as possible, so the sugar is in contact with as much oil as possible. But I found the result with a nonstick pan to be quite nice, without the worry of un-seasoning my wok.
Sweet and sour ribs cooking process
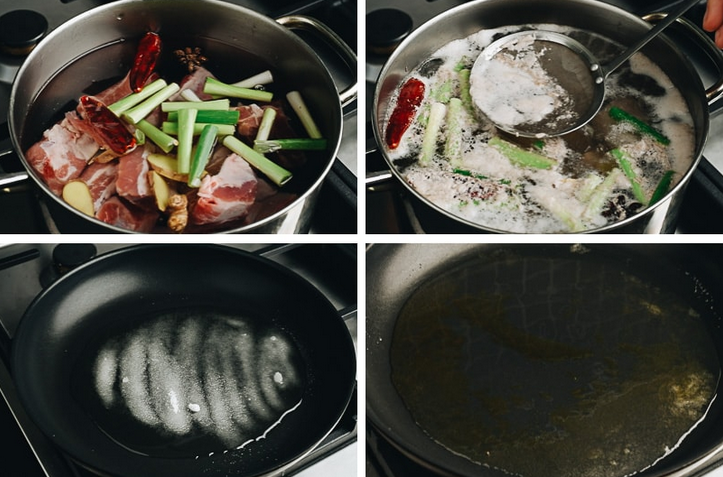
- Blanch the ribs with aromatics
- Skim the brown foam, then drain the ribs
- Heat up sugar in oil
- Melt the sugar slowly, until it turns golden
- Add the ribs and quickly turn over several times to coat each side with the melted sugar, then transfer to a plate
- Saute the garlic with a bit of oil
- Add and reduce the sauce
- Mix everything together
NOTE
You might find that I use a lot of oil in the recipe, which facilitates the sugar melting process. But don’t worry, the ribs won’t absorb all this oil during the cooking and you will discard most of the oil in the end. It is very important that you remove the excess oil after browning the ribs and before adding the sauce. If there’s too much oil in the pan, the sauce won’t thicken properly.
Kam’s court, a chinese restaurant in Charmhaven, which was established in 1992. A friendly, family restaurant that has always been a good party place for family gatherings. We provide delicious and popular Chinese cuisine and are licensed. We invite you to come and enjoy our warm and friendly hospitality.
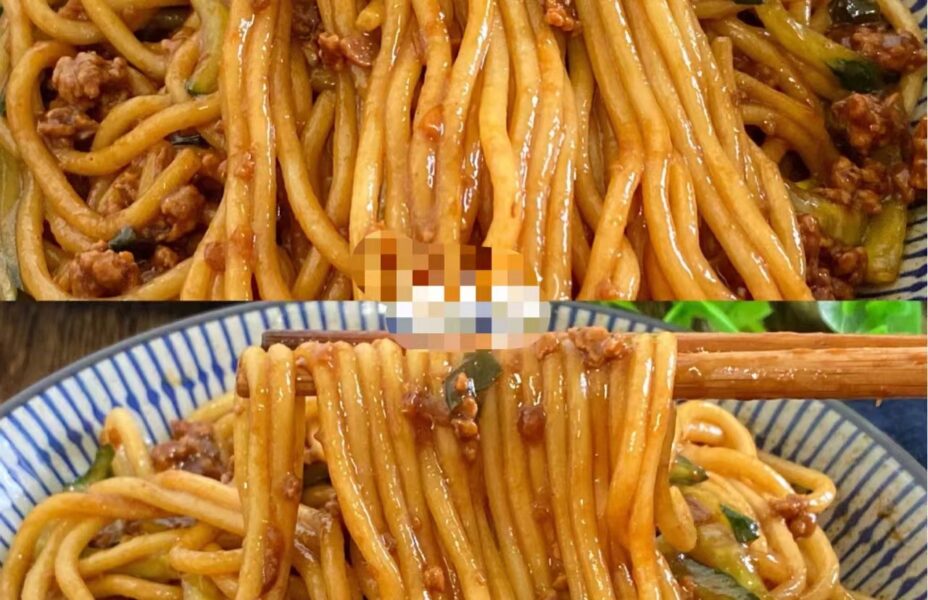
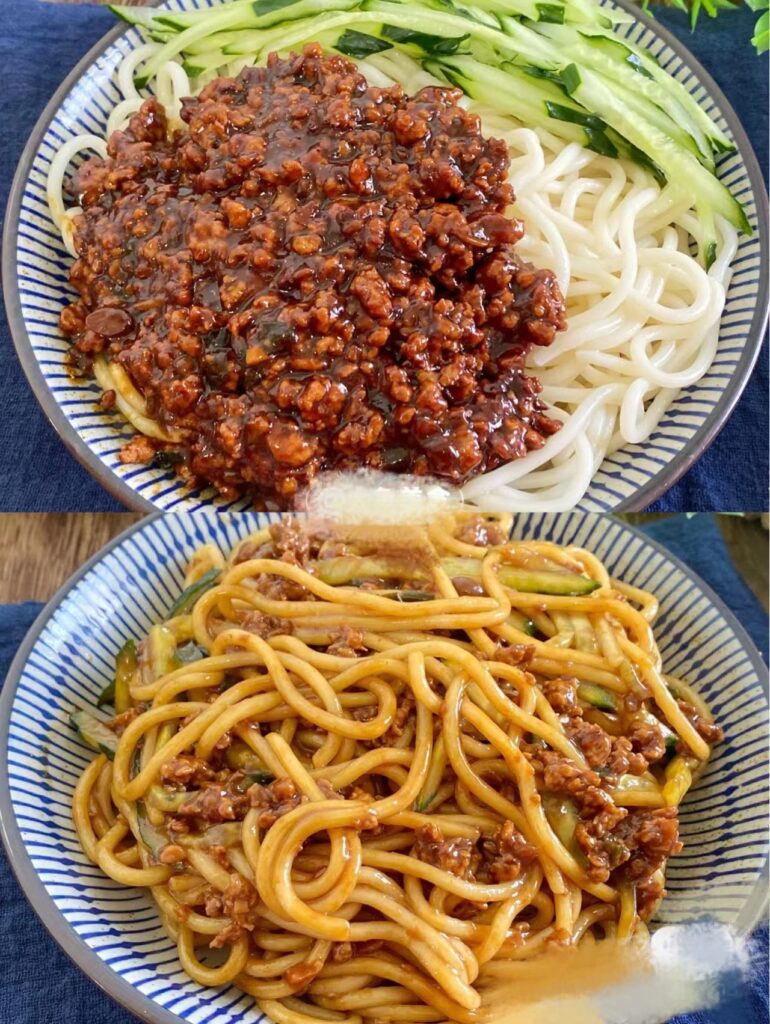
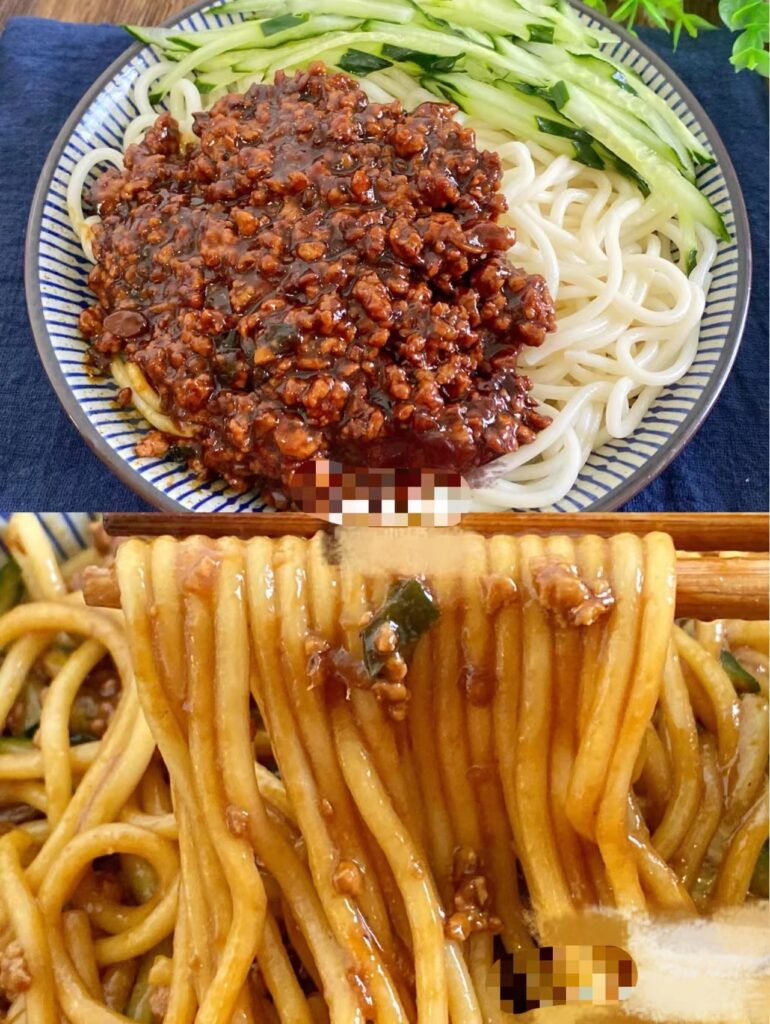
Beijing Fried Sauce Noodles
These saucy noodles are quintessential Beijing street food, a popular dinner dish that has lines for weeks. With just a few ingredients, this simple recipe is packed with authentic flavor and ready in 30 minutes.
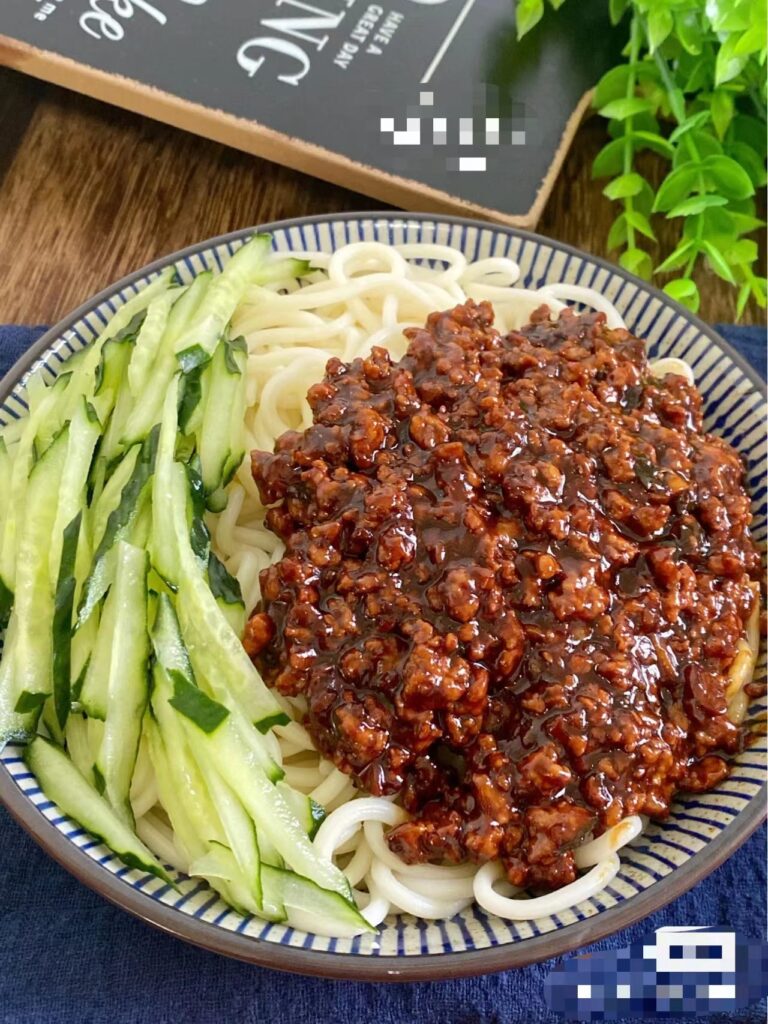
Beijing fried sauce noodles are made by cooking the sauce and mixing it into plain white noodles that are boiled separately. The dish is garnished with a big dollop of sliced cucumber, for a crunchy saucy noodle when it’s all mixed together. The sauce is the best part, and you can eat it with rice too if you like rice better!
This dish is also a fast one – you can make it in just 30 minutes! It’s one of the simplest noodle recipes I know and people really enjoy it. If you want to cook food that will last you a couple meals, this is also where it’s at. I make Zhajiangmian frequently when I am busy and this recipe lasts me for a week of dinners. When you reheat the Zhajiangmian sauce, add a little water to make it fluid again (it tends to thicken up in the fridge), boil it for a few minutes till it’s hot, and spread it on plain noodles for a yummy 10 minute dinner.
Ingredients
- 1 lb ground pork
- 6 tablespoons black bean sauce
- 2 russet potatoes diced 1cm x 1cm x 1cm dimensions
- 2 cups boiling hot water
- 24 Oz Chinese noodles*
- 1 cup cucumber cut to matchsticks
- 1 tablespoon oil
Instructions
- Peel and dice two russet potatoes. Let soak in water as you prepare the rest, so the starch comes out to the water.
- Add 1 tablespoon of oil to a wok or stir fry pan on high, and let the oil heat up for 1 minute.
- Add thawed ground pork and break into pieces with a spatula, stirring ask you cook till meat is brown all over and only small pieces are left.
- Meanwhile boil some Chinese noodles on high heat in a separate pot.
- Add 6 tablespoons black bean paste to the ground pork, and stir till equally mixed.
- Add drained diced potatoes, then add 1.5 cups of hot boiling water. This can be the water leftover from boiling the noodles (contains starch from the noodles to help thicken the sauce). You can also use the water you soaked the potatoes in if you heat it up first.
- Turn the heat down to medium-low and boil 10 minutes with a lid on the sauce, until potatoes are cooked (soft). Depending on your stove, you may use medium instead of low heat – use the heat setting that lets you see soft bubbles but not full blown boiling. Make sure to keep the cap on so the potatoes cook fast and the sauce doesn’t get too dry.
- If most of your liquid has boiled off in the previous step, add 1/2 cup to 1 cup hot water to the cooked sauce to make the sauce more saucy . Stir well.
- Pour 1 serving of meat sauce over 1 serving of noodles and garnish with cucumbers cut into matchsticks.
- Mix and enjoy!
Kam’s court, a chinese restaurant in Charmhaven, which was established in 1992. A friendly, family restaurant that has always been a good party place for family gatherings. We provide delicious and popular Chinese cuisine and are licensed. We invite you to come and enjoy our warm and friendly hospitality.

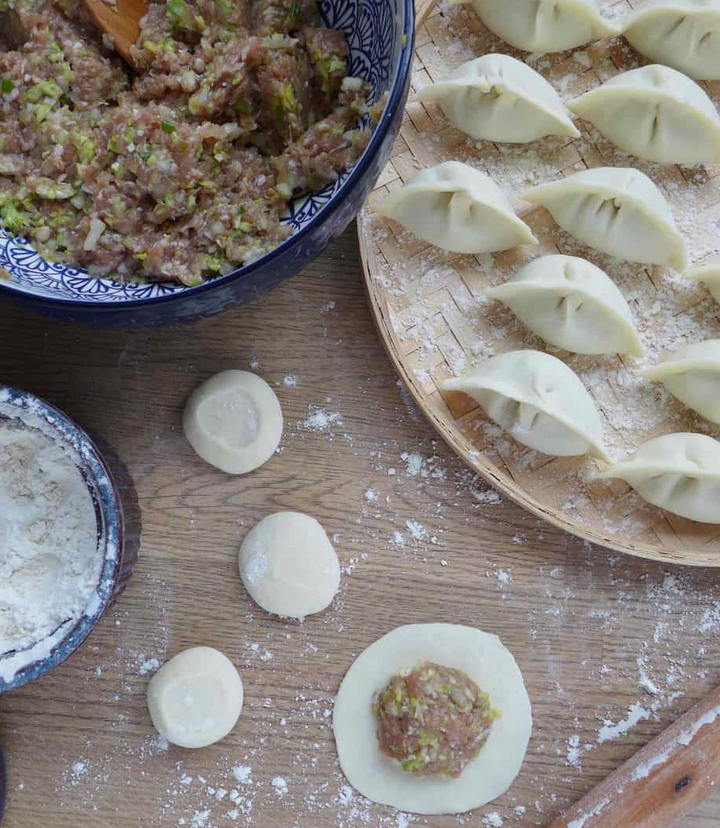
Pork dumpling with cabbage
Tasty and juicy filling wrapped with pleasantly chewy skin, Chinese pork dumpling with Napa cabbage is an absolute classic! This recipe includes make-from-scratch instructions.
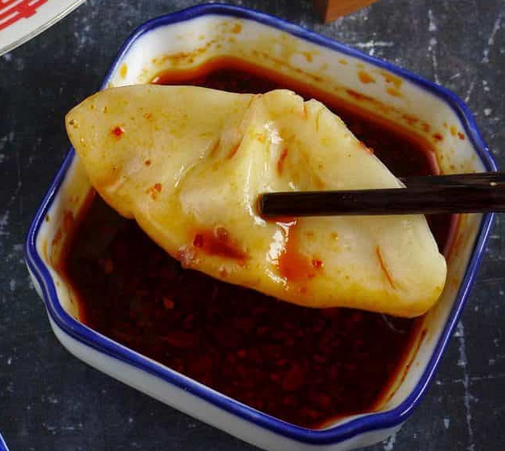
It’s safe to say that boiled dumplings with pork and Napa cabbage filling are the most popular variety in Northern China where dumplings are a common dinner option. I absolutely love the clean taste of this type of dumplings. With a simple dipping sauce, they make a tasty & healthy all-in-one meal.
A tasty & juicy filling
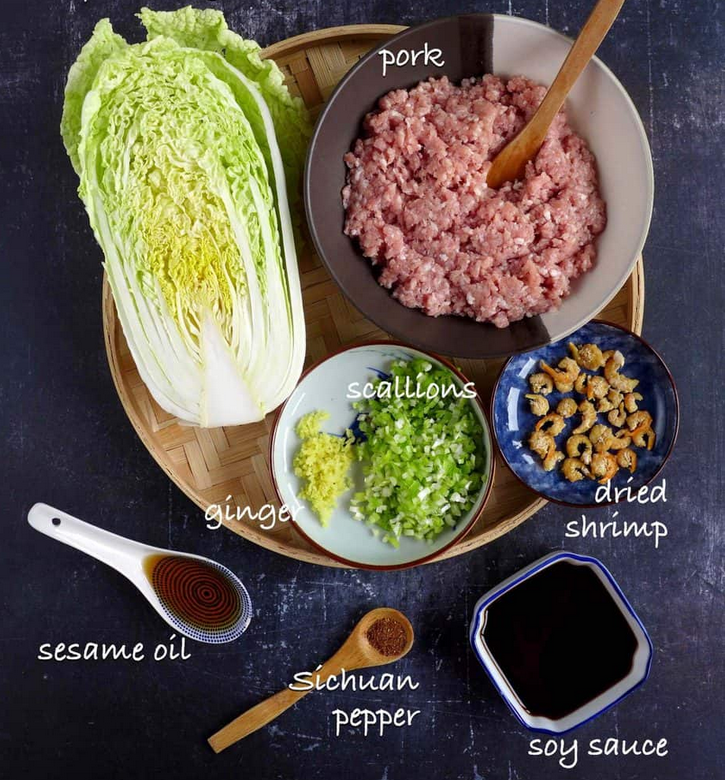
Here is a list of ingredients that you need to make the pork and cabbage filling
Minced pork. For best taste, choose one with high-fat content, preferably no less than 20%.
Napa cabbage, also known as Chinese cabbage.
Scallions & ginger. They’re essential aromatics for meat-based dumpling fillings.
Light soy sauce. It’s fine to use soy sauce that’s not specified as light or dark.
Ground Sichuan pepper (or Chinese five-spice powder).
Dried shrimp (or dried scallops). Offering complex umami flavour to the filling, it needs to be pre-soaked in water until soft then chopped into tiny pieces.
Sesame oil. It adds a distinctive aroma and helps to lock in the moisture of the meat.
As I’ve explained in my Dumpling Filling Guide, a good filling shouldn’t taste dry, yet it can’t be overly wet as it will make assembly impossible.
Tips:
In Chinese households, Napa cabbage is usually hand-chopped into tiny pieces. If using a food processor, remember not to overdo it. Otherwise, you’ll end up with a watery mess.
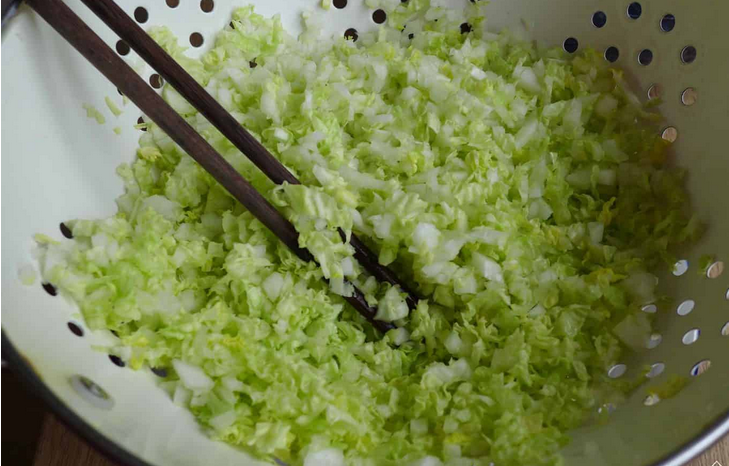
- Do not add finely chopped Napa cabbage directly into the meat. Instead, stir in some salt and leave to rest for a while.
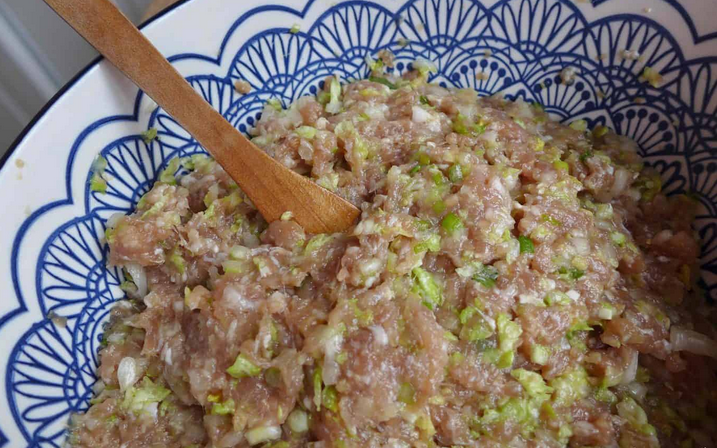
- Mix the pork with minced scallions, ginger, light soy sauce, ground Sichuan pepper and minced dried shrimp (along with the water in which it was soaked). Stir until the liquid is fully absorbed by the meat.
- Squeeze the cabbage in batches to remove water extracted by the salt. Add to the pork. Pour in sesame oil and mix to combine.
Do not combine the pork and the cabbage until you’re ready to assemble the dumplings. If you wish to prepare the filling in advance, store the seasoned meat and squeezed cabbage separately. Mix them right before the assembly takes place.
Homemade wrappers
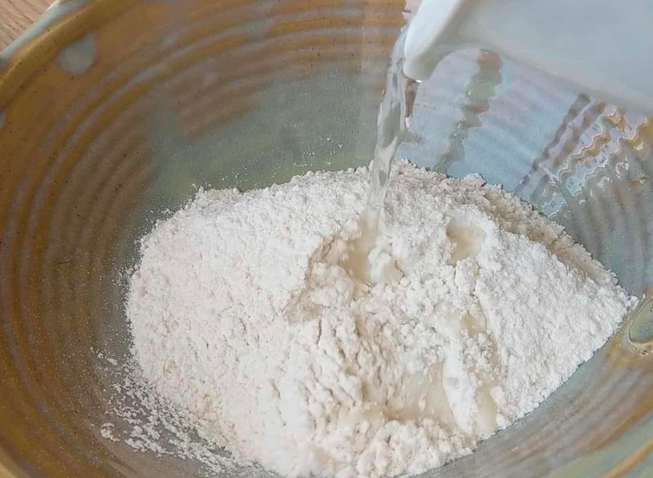
Have you tried making your own dumpling wrappers? Do you know it requires only all-purpose flour (plain flour) and water to make them? And they taste much better than shop-bought ones!
Flour-water ratio
The flour-water ratio is about 2:1 by WEIGHT (not by volume). For example, to make a dough for about 30 wrappers, you’ll need
- 250 g all-purpose flour/plain flour (about 2 cups)
- 130 g water at room temperature (½ cup+2 tsp)
Tips:
- It’s fine to use measuring cups but be aware that it’s less accurate and you’ll need to do it properly: sift the flour first then spoon it into the cup (without pressing). Scrape across the cup with the back of a knife to level.
- Depending on the brand of your flour and the humidity of your kitchen, you may need to adjust the water slightly. The initial dough should be medium-firm and it will become softer after resting (watch the tutorial video in the recipe card below to see the desired consistency).
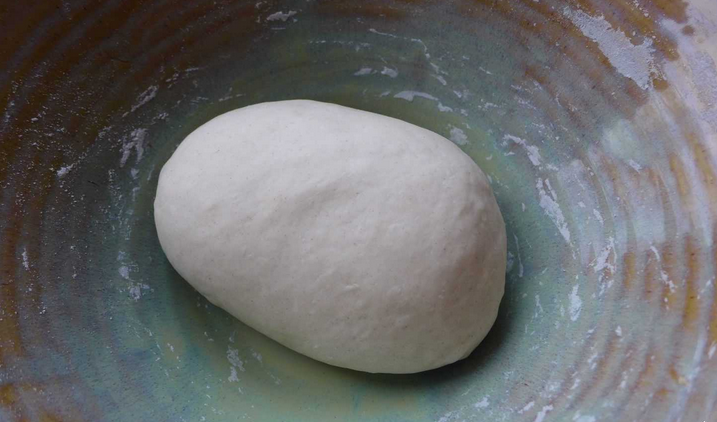
Knead & rest
Making the dough is pretty straightforward. Combine flour and water then knead it into a smooth dough. You may achieve this either by hand or using a stand mixer with a dough hook.
- By hand: After forming a rough-looking dough, leave it to rest for 10 minutes then knead it again. This way it’ll take you very little effort to achieve the smoothness.
- With a stand mixer: Mix and knead the dough on low speed for about 8 minutes.
Once the dough is done, cover it and leave to rest for at least 30 minutes. It’ll become softer, more stretchy thus ready to be rolled out into wrappers.
Roll the wrappers
- Roll the dough into a loop (or a few ropes). Then cut it into equal, small pieces.
- With the palm of your hand, flatten each piece into a round disc.
- Use a rolling pin to roll them one by one into thin wrappers.
I use the traditional “roll and turn” method to do it efficiently (The video in the recipe card below demonstrates how). Also, wrappers rolled out this way are thinner on the edge and thicker in the middle.
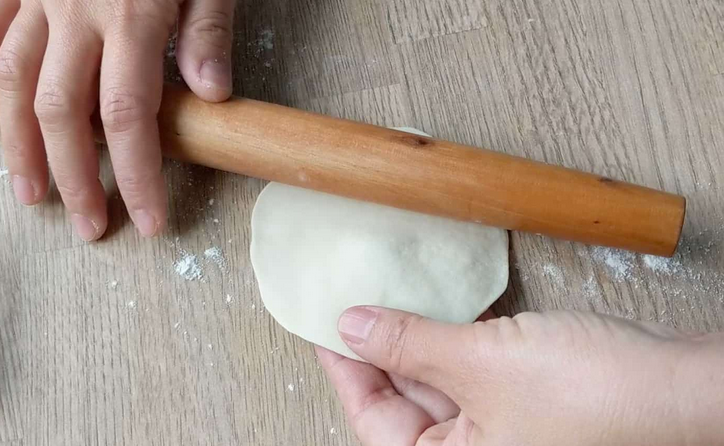
Tips:
- Always cover the unused dough to avoid drying out.
- Dust a little flour on the work surface and over the rolling pin to prevent sticking (but don’t overdo it).
- Try not to roll too many wrappers at once (unless someone is helping with assembly) as they dry out quickly.
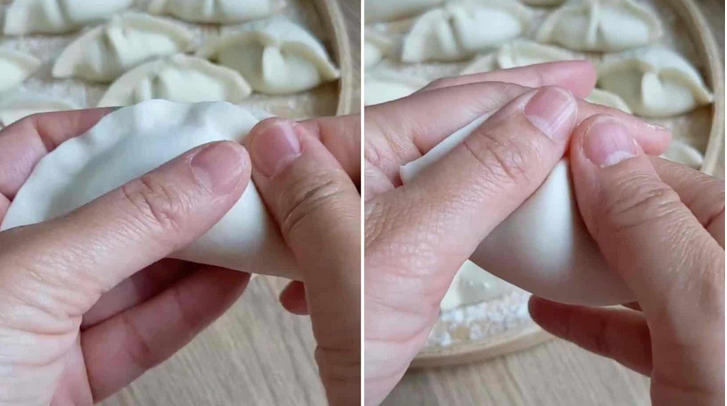
Assemble the dumplings
I’ve introduced many folding techniques in previous dumpling posts (Ten Ways to Fold Dumplings being the most comprehensive one). Yet this time, another simple variety came to my mind.
- Place a spoonful of filling in the middle of the wrapper.
- Fold the wrapper then pinch to seal all around the edge.
- Hold the dumpling in between your two thumbs and two index fingers then squeeze to shape it further (please refer to the video below).
This pattern may not look as fancy as the ones I introduced before. But if you had a chance to eat dumplings with a regular northern Chinese family, highly likely you’d see them in this form.
Tips: No matter how you pleat the dumplings, follow three rules for an optimal result:
- Make sure your seal them very well. Otherwise, the filling might leak during boiling.
- Try to wrap an appropriate amount of filling, neither too much nor too little, and avoid having too much air trapped inside the wrapper.
- Sprinkle flour over the surface where you’re placing the dumplings to prevent sticking. Don’t leave uncooked dumplings for too long before cooking (see freezing tips in later sections).
Boiling dumplings: the traditional trick
Unlike other recipes, I won’t tell you how long it takes to boil dumplings. Here is how:
- Bring a large pot of water to a full boil then carefully slide in the dumplings (Depending on the size of your cookware, you may need to cook them in batches).
- Once the water comes back to a full boil, add some cold water to calm it down then cover with a lid. Repeat the same procedure another two time. Then your dumplings will be fully cooked.
- To remove excess starch and minimize the possibility of sticking, drain the dumplings then rinse briefly under tap water (only if it’s drinkable).
I guess you might want to ask: why add cold water three times? Well, it helps to avoid vigorous boiling. The wrappers and filling can be cooked evenly this way. Also, the wrappers have less chance of tearing or being overcooked therefore achieving a pleasantly chewy texture.
Serve with a sauce
Don’t forget to prepare some dipping sauce for your boiled pork dumplings. Our family’s go-to quick solution is a simple mixture ofChinese black rice vinegar and homemade chili oil. Pungent and aromatic, it’ll take your dumpling meal to the next level.
Kam’s court, a chinese restaurant in Charmhaven, which was established in 1992. A friendly, family restaurant that has always been a good party place for family gatherings. We provide delicious and popular Chinese cuisine and are licensed. We invite you to come and enjoy our warm and friendly hospitality.
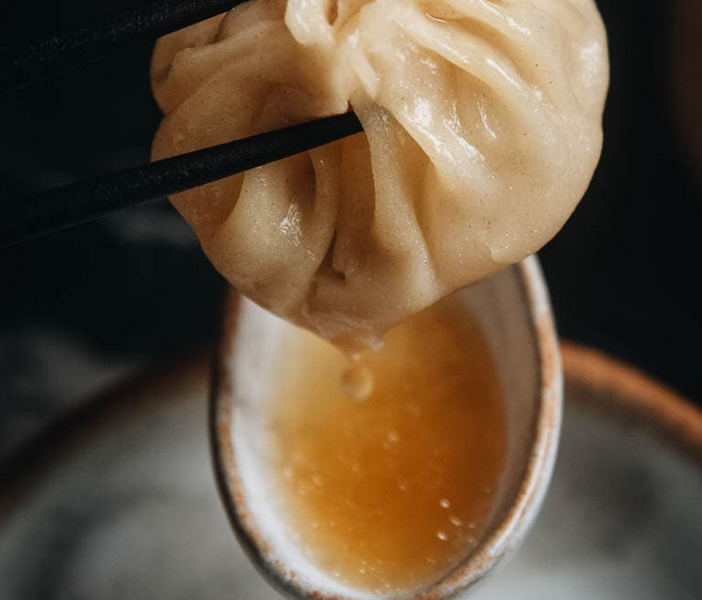
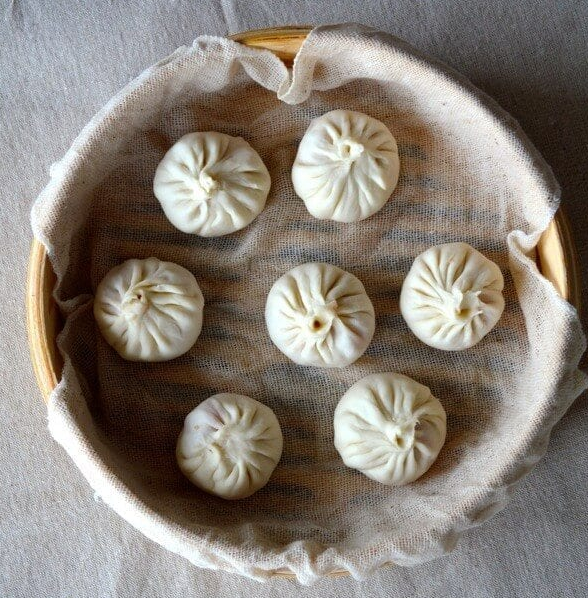
What Are Soup Dumplings
Soup Dumplings, or soup dumplings, are a type of steamed dumpling from Shanghai cuisine (Jiangsu province for the greater region). In China, you will find there are many versions of soup dumplings that come in different flavors and sizes, but the most popular one is Xiao Long Bao. It features a paper thin wrapper filled with a very mild pork filling and a pocket of fragrant soup, served with a gingery vinegar dipping sauce.
Soup Dumplings is a type of dim sum that is traditionally enjoyed as a snack or during a meal as an appetizer or even a main dish. It’s certainly a complicated dish to make at home. But it’s such a great way to impress your guests if you’re hosting a dinner party.
Each dumpling is pleated with many folds. Once steamed, the delicate dumplings are dipped in a mixture of Chinese black vinegar and julienned ginger for the perfectly balanced bite.
Soup dumplings are traditionally made with a plain pork filling, while some versions contain a mixture of pork and crab. New and modern versions may also contain other types of meat, seafood, or vegetarian fillings.

How Do They Get the Soup into the Soup Dumpling?
That, my friends, is the million dollar question!
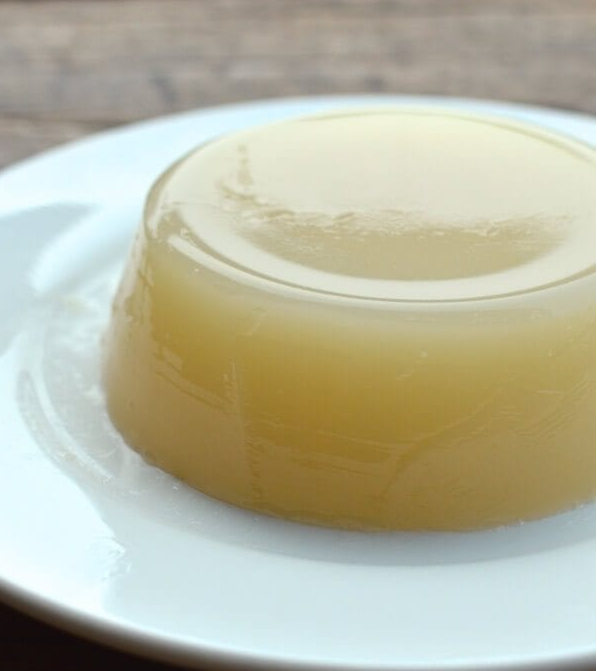
The secret to getting the soup into a Chinese soup dumpling is to create a rich pork aspic using collagen/gelatin-rich pork skin and neck bones. The aspic is basically the soup in solid form, allowing you to fold it into the filling.
Once steamed, the gelatinous aspic returns to its liquid form, creating those rivers of hot soup that you can slurp out the sides of the dumpling! Developing This Recipe Perfecting this technique is not easy, and I will say that this was not an easy recipe to create. Having eaten these in restaurants in Beijing, Shanghai, and around the world, our standards are high. We tested and tried many versions to get each element correct, from the dough, to the filling, to the soup. Now, every time we walk into a xiaolongbao restaurant, we’re amazed by the speed and ease with which those cooks prepare these delicate dumplings.
But I’m so excited about this recipe and to finally be able to share it with everyone. It’s a family favorite (Sarah has a particular obsession with them), and well worth a little patience in the kitchen.
If you don’t have a bamboo steamer, Try buying one at an Asian grocery store.
Soup Dumpling Recipe Instructions
Step 1: The Aspic
The first thing to make is the aspic, or meat gelatin, which will create the soup in the soup dumplings.
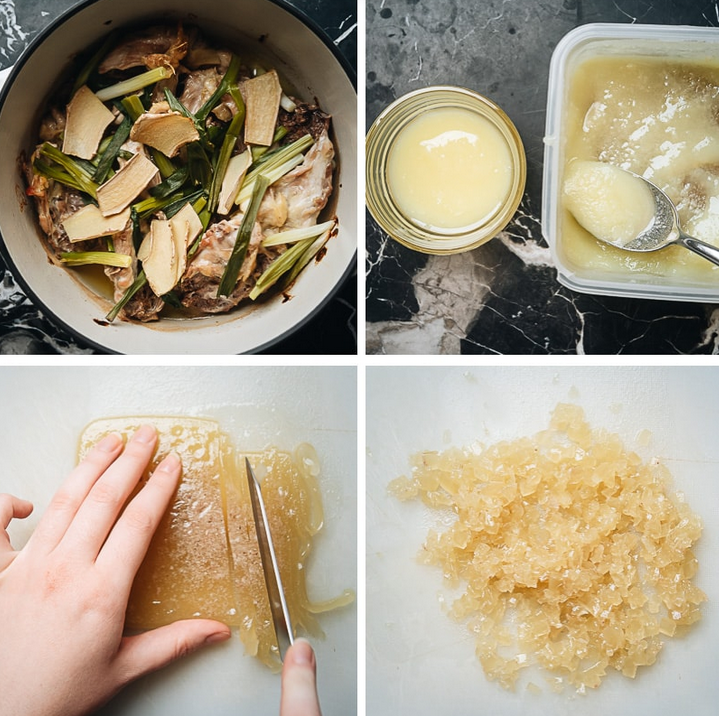
You’ll make a pork soup with bones and skin (don’t freak out at this! The Chinese—as well as all of the world’s great food cultures—have learned to utilize every part of an animal and leave nothing behind to waste!), which will help you create a smooth, firm aspic once chilled.
You can use the skin from a skin-on pork shoulder and buy pork neck bones or ham bones. If they’re not readily available in your local market, ask the butcher.
½ lb pork skin (225g), cut into 1-inch strips
1 lb (450g) pork neck bones (you want neck bones that still have meat on them!)
water
2 slices ginger
1 scallion, cut into 3 pieces
1 tablespoon shaoxing wine
In a small pot, add the pork skin and pork bones and cover with cold water. Bring to a rolling boil, and immediately drain and rinse off the bones and the skin. This gets rid of any impurities.
Rinse out the pot and put everything back in. Add 4 cups (950 ml) of water along with the ginger, scallion and wine. Bring the pot to a boil and then reduce the heat to low. Cover and simmer for 2 hours.
After 2 hours, turn off the heat, allow the soup to cool, and strain the liquid into a bowl. As to the leftovers in the pot, you can discard them or go the Chinese route, which would be to drizzle some light soy sauce over everything and start grazing).
Once the liquid is completely cooled, cover and refrigerate overnight.
This is what you’ll have the next day. Meat jello!
Step 2: The Dough
1 cup all-purpose flour (130g)
6 tablespoons warm water (90 ml)
In a mixing bowl, add the flour and warm water 1 tablespoon at a time. Work and knead the dough for 15-20 minutes. The dough should be very soft and smooth. Cover with a cloth and let it rest for 30 minutes.
Step 3: The Filling
1 pound (450g) ground pork (70% lean 30% fat)
2 tablespoons shaoxing wine
3/4 teaspoon salt
1/2 teaspoon sesame oil
3/4 teaspoon sugar
3 teaspoons light soy sauce
3 tablespoons water
A pinch of ground white-pepper
1 tablespoon minced ginger
1 heaping cup of your aspic, diced into ½-inch pieces
Take your ground pork and put it in the food processor. Pulse for 30-60 seconds until the pork resembles paste. In a mixing bowl, add the pork and all the rest of the ingredients except the aspic.
Whip everything together thoroughly, for about 2 minutes. You want everything to be extremely well combined, and the pork should look like a light, airy paste. Gently fold in the diced aspic, and do not over-mix.
Cover and transfer the filling to the refrigerator until ready to make the dumplings. If you’re ready now, you can put it in the freezer for 15 minutes to allow it to firm up and make assembling the buns easier.
Step 4: Assembly
Lightly dust a clean work surface with flour and roll the dough into a long cylinder/cigar, about an inch in diameter. Cut the dough into small equal pieces weighing about 11 grams each (the dough chunks should be a size resembling that of gnocchi).
Roll out each piece into a round disc about 3 – 3 ¼ inches diameter. Keep everything under a damp cloth.
Prepare your bamboo steamer. You can line it with cheese cloth…
napa cabbage leaves, or these lovely bamboo steamer discs, which can be found in some Chinese restaurant supply stores (if using these, you must brush the discs with oil first!).
When all that is prepared, take out the filling. You’ll be making each bun one at a time. Place about 1 tablespoon of filling in the middle of your dumpling skin. Pleat with as many folds as you can muster: 12-18 folds should do it.
Watch the video in our Carrot Ginger Pork Bun post. The technique is very similar. Basically, as you fold, you’re constantly using your thumb to push the filling into the resulting little “bag” that you’re creating with the dough. For this one, you’re just making more folds.
Make sure the top is sealed. If the filling ever gets too wet or hard to handle, put it in the freezer for another 15 minutes and start again.
Place the buns in the lined steamer basket, about 1 1/2 – 2 inches apart.
Step 5: Steaming
In a metal steamer pot or wok, boil water. If using a wok, put the water at a level so that when you put the bamboo steamer into the wok, the water rises about ½ inch up the bottom of the bamboo base. You never want the water to touch the dumplings inside, though, so make sure not to fill it too high!
Make sure not to fill it too low either, because if all the water evaporates, you could end up burning your bamboo steamer. See our post on how to set up a steamer if you’re not familiar with steaming foods in Chinese cooking.
Once the water is boiling, put the bamboo steamer in the wok or steamer pot, cover with the bamboo steamer lid, and steam over high heat for 8 minutes. Immediately remove the bamboo steamer from the pot and serve.
Step 6: Eating!
Ok, so there is definitely a proper way to enjoy these dumplings. Put away the soy sauce, because it has no place on the table right now. What you want is Chinese black vinegar.
Pour some out into a small, round dish or bowl, and top with some very thin matchsticks of ginger. You can also dilute the vinegar with a tiny splash of water to make the flavor a little more delicate.
Take out your two utensils—chopsticks and a Chinese soup spoon (a fork would just butcher these and the soup would dribble out all over the table. It would be a tragedy of Shakespearean proportions).
Carefully, slowly peel the xiaolongbao off of the steamer basket and dip it into the vinegar.

Kam’s court, a chinese restaurant in Charmhaven, which was established in 1992. A friendly, family restaurant that has always been a good party place for family gatherings. We provide delicious and popular Chinese cuisine and are licensed. We invite you to come and enjoy our warm and friendly hospitality.
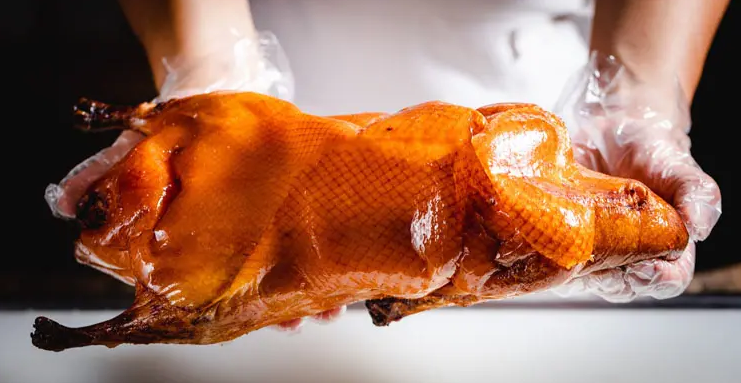
Beijing Duck Recipe, and How to Eat It
Beijing duck is also known as Beijing roast duck. It is Beijing’s best and most famous dish. With a legendary taste and dining experience, not only tourists but also high-ranking government leaders make it a point to eat Beijing duck in Beijing.
Why is Beijing Duck Famous?
- Beijing duck is called “the first dish to taste in China”. It has a long history: it used to be a royal dish in medieval China and gradually spread to civil society later.
- Beijing duck was appointed as one of the national dishes for the reception of foreign guests by Premier Zhou Enlai (the first Premier of the people’s republic of China) since the 1970s. It is highly praised by heads of state, government officials, and domestic and foreign tourists.
- As Beijing is the capital of China, and Beijing roast duck is the most famous dish in Beijing, it has gained ultimate prestige as a China dish.
A Traditional Beijing Duck Cooking Method
An authentic Beijing duck can take up to three days to prepare. It is an intensely complex process with many requirements.
The duck must be of the white Beijing variety and of superior quality, a “force-fed duck” that weighs about three kilograms.
Day one: Slaughter the duck. Pluck, eviscerate, and rinse thoroughly with water. The neck bone must be removed without breaking the skin, then the duck is hung to dry overnight.
Day two: Compressed air is injected into the duck between its skin and flesh to make the skin glossy and shiny. Then, once again, it is hung to dry with a glaze added to the skin.
Day three: The duck is roasted in a wood-fired brick oven for around 40 minutes. Through using a less-smoky, hardwood fuel like fruit tree branches (pear, peach, or date branches for instance), the duck has a fruity flavor and is red. It is roasted until the skin is crackly crisp and then served immediately.
How to Cook Beijing Duck at Home in a Simpler Way
It is difficult to make a real Beijing duck at home, because it not only requires that the skin be separated from the meat by forcing pumped air between the skin and the meat, but also that it is roasted over fruit tree wood to impart a special flavor and aroma.
As these two processes are not easily implement at home, here we introduce a simpler process for cooking Beijing duck:
1. Make a small hole at the bottom of the duck and take out the viscera. Then wash the duck.
2. Place the duck on a rack. Boil a pot of boiling water, and slowly poured the hot water over the duck. Making sure to get it on all sides. The skin immediately shrinks and tightens around the duck.
3. Mix soy sauce, wine, and salt in a bowl and massage it into the duck, and then let it sit for about an hour.
4. Dilute honey with water and apply it to the duck’s skin. (This is for the crispy skin effect.) You may want to do this more than once.
5. Leave the duck on a plate uncovered, put it in the refrigerator overnight (5-6 hours) to let the skin dry out.
6. Put the duck in an oven, set the temperature to 350°F (180°C) and roast for about 40 minutes. The color of the duck will become brown and red and shiny. Serve immediately!

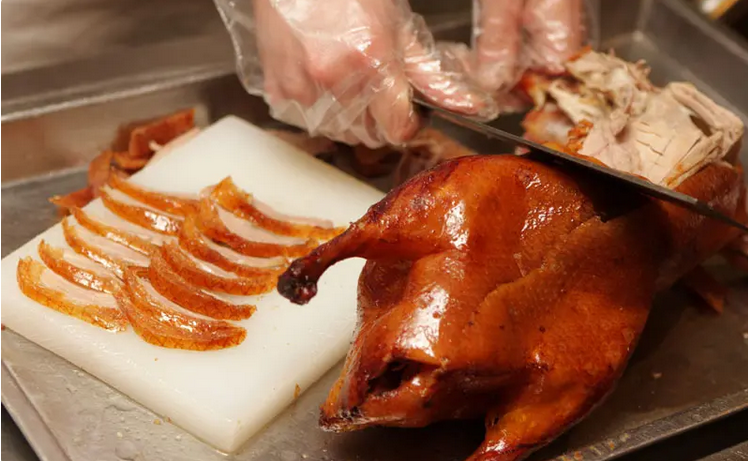
How to Eat Beijing Duck
- Slicing the Duck
The manner of serving and eating Beijing duck is unique. The chef presents you the whole duck before taking it away for slicing, or at some restaurants slicing it in front of your table. Each slice is very thin, containing both meat and skin.
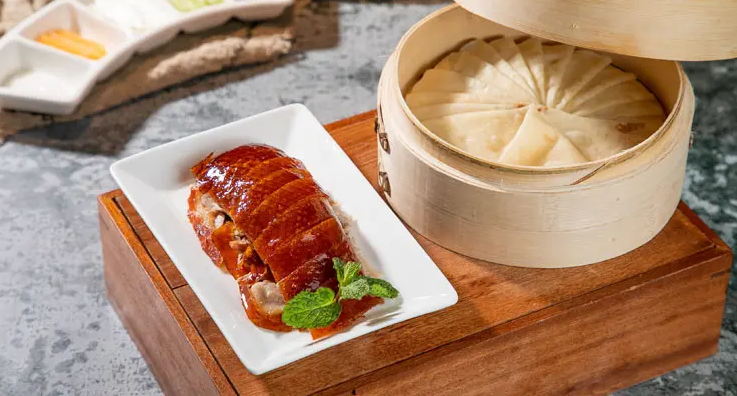
- Condiments and Side Dishes
The condiments include sweet plum sauce, cucumber and sugar, mashed garlic and scallions. Other condiments you could add are sugar and mashed garlic; you can choose hollow sesame biscuits or mandarin pancakes as side dishes to wrap the Beijing duck meat in.
- Wrapping the Beijing Duck Slices
The best way to eat the duck is to take a pancake in one hand, then with your chopsticks pick up a slice of duck and coat it in the plum sauce. Spread the sauce onto the pancake using the duck, then add some more slices of duck and some cucumber and green onion. Finally, roll up the pancake and eat it with your hands — delicious!
Kam’s court, a chinese restaurant in Charmhaven, which was established in 1992. A friendly, family restaurant that has always been a good party place for family gatherings. We provide delicious and popular Chinese cuisine and are licensed. We invite you to come and enjoy our warm and friendly hospitality.